This article will introduce you to the product page and teach you how to add, edit and update your items manually.
Contents:
Overview
Your store wouldn’t be one without products, and Jazva offers a wide range of options for you to define and distinguish every item in your database. This document is best used after you have imported products from your channels and learned the basics of using Jazva.
Before you start growing your product database, we recommend familiarizing yourself with these articles to understand how products, variations and kits work in Jazva:
- Understanding Products in Jazva
- Virtual Products: Kits and Bundles
- The Significance of SKUs
- Variations, Product Attributes & Soft Options
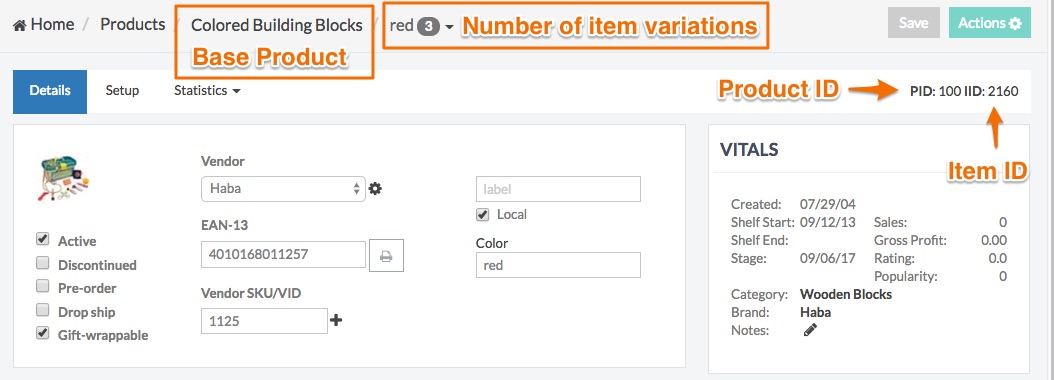
In Jazva, a base product is identified by a Product ID (PID). A product page will have 3 tabs: Details, Setup and Statistics.
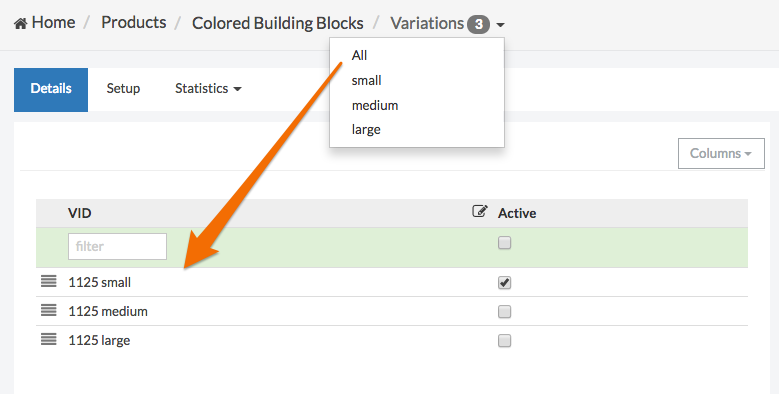
If a base product has more than 1 variation, then each item variation will have its own Details page, named after its attribute and numbered with an Item ID (IID).
Adding Products Manually
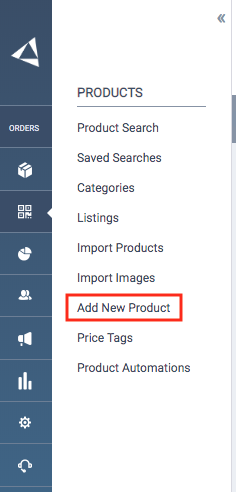
- From the main menu, navigate to Products and select Add New Product.
- Complete the required fields in the Product Info section and Add Item tab:
- Title
-
Description
-
Vendor
- Vendor SKU - your main/internal SKU
- Cost
- Other fields and attributes are optional.
- If the product is a kit comprising other items, toggle to the Add Kit tab, add items by entering SKUs in the search field, and then adjust the quantities.
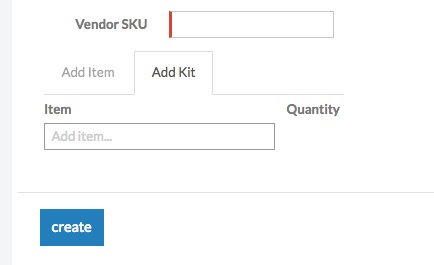
- Click Create and you will be redirected to the new Details page.
Your product is now in the system at its most basic form. We recommend completing the product information by following the setup guide below. Products can also be updated in bulk via the Basket Actions.
Updating Product Details
With Jazva, you can define your products in great depth using a variety of options. Please keep in mind that some of these settings will not apply to all your sales channels. Some may only apply to Jazva web stores.
Adding Images
- Open up an existing product.
- From the item’s Details page, click Product Image. If the product already has an existing image, click the image.

- A dialog box will appear, allowing you to select a default image. If you have variations, each item will have a designated section below the default.

- You can upload images by clicking +Add, or by dragging and dropping the image files into the appropriate sections. Each variation can have multiple pictures.
- Drag the images freely to rearrange their order. The first image will be the default for that item.
- Click Close.
- You may refresh the page to see the new image.
To upload product images in bulk, please visit Uploading Product Images via the Basket
Defining Details and Attributes
- Open an existing product.
- From the Details tab, select the following status options that apply to your item:

- Active – this setting allows the product to be published and updated on their linked channels.
- Discontinued – marks the product as discontinued.
- Pre-order – this setting allows the product to remain on sale even if stocks reach zero.
- Drop ship – allows the product to remain on sale even if stocks reach zero. This also automatically drop ships orders.
- Gift-Wrappable – this setting marks the product as gift-wrappable.
- Select a primary Vendor. To add multiple vendors, click on the gear icon. Complete the required fields for each additional vendor as needed.
- Enter a barcode. You can change the barcode identifier type by clicking on the title (i.e. UPC, EAN, GTIN, etc.) You can also print Product Barcode Labels by clicking the print button.
- Enter a Vendor SKU/VID.
- Attribute and Soft Options will appear on the right panel of the details page if applicable. Please visit Variations, Product Attributes & Soft Options to learn how to set them up.
Adding Inventory
Inventory can be added using various methods such as via Inventory Import or automatically when Receiving a Shipment. Inventory can also be entered directly from a product.
- Open an existing product.
- From the Details page, click the pencil icon next to Inventory.
- Enter inventory counts for each facility. Upon saving, the main inventory count will be updated with the totals of each facility.

- You can assign a bin location for the product in each facility’s bin field, as well as a bin count underneath the facility total. Bin locations are designated at the item variation (IID) level.
- If unit counts are not placed into a designated bin location, they are considered unaccounted for and the negative discrepancy will be displayed in Red.
- If unit counts are placed into a designated bin location and their total exceeds the facility total, they are considered overstock and the positive discrepancy will be displayed in Green.
- For future ordering reference, complete the following fields and options:
- Pack Size – the number of units the vendor includes in the package to ship the product, similar to a Minimum Order Quantity (MOQ).
- Min Reorder – the minimum quantity to procure for automated reordering.
- Reorder Point – the quantity threshold at which point the system will reorder the product. We recommend keeping it at Auto. You may also visit Inventory Reordering to learn more.
- Click Save.
Sales Channels
Listing titles, prices and images can be set uniquely for each channel. Please note that not all sales channel support product and item-specific titles. Please visit Listing Profiles, Titles and Descriptions for a detailed guide on channel-specific listings.

To set channel-specific titles:
- From an item’s Detail page, scroll down to Sales Channels and select a channel.
- In the Mapping dialog box, change the Channel-Specific Title from “(Default)” to a unique title. This can be done on both the Product and Item level.
- Click Save Changes to finish.
To set channel-specific price:
- From an item’s Detail page, scroll down to Sales Channels, and select a channel.
- In the Mapping dialog box, change the Channel-Specific Price from “(Default)” to a unique price.
- Click Save Changes to finish.
To set channel-specific images:
- From an item’s Detail page, scroll down to Sales Channels, and select a channel.
- In the Mapping dialog box, click Image.
- Mark the Use Channel-Specific Image checkbox.
- You can upload images by clicking +Add, or by dragging and dropping the image files into the appropriate sections.
- Click Close to finish.
Some channels may have more options and details than others. For instance, Amazon and eBay have Repricer tabs while others do not. For more information, please visit Channel-Specific Product Images.
Pricing
To sell a product, you need to enter a selling price. You can also add other costs and related pricing for additional metrics or to customize your pricing structure.
- Open an existing product.
- From an item’s Detail page, scroll down to the Pricing section.
- Complete the required fields and options:

- Price – the selling price of the item.
- Cost – the cost of the item.
- Reg. Price – an alternate price of an item for reference.
- MSRP – the MSRP of an item for reference.
- Freight Cost – the freight cost of shipping the item.
- MAP – the minimum advertised price (MAP) is the minimum price allowed by the product manufacturer. This is the price stated in the minimum advertised pricing policy set by sales channels.
- Floor and Ceiling - this is exclusively used for repricing strategies. Floor is the minimum price, and Ceiling is the maximum price the repricer will allow.
- Click Save to finish.
To add special pricing for tiers:
- Click +Add Tier Price Tag.
- Select a Tier from the drop-down list.
- Complete the following options:
- Qty – the minimum quantity the order must meet to apply the special pricing.
- Price – the special selling price of the item.
- Discount – the discount to deduct from the original price.
- Date From & To – the validity of the special pricing.
- Click Save to finish.
Miscellaneous (Shipping and Other Options)
From the item’s Details page, scroll down to Miscellaneous and complete the pertinent shipping information:
- Surcharge – adds a shipping surcharge
- Ships In – sets a note to describe the item’s packaging
- Age Range – sets an appropriate age range
Manufacture - Create Bill of Materials.
This option is used to for Jazva’s Light Manufacturing Support
Product Dimensions and Box Packaging - please note, this is not the shipping box dimensions.
- L * W * H – the length, weight and height dimensions of the item.
- Weight – the weight of the item.
- Ship-Ready* – sets the item to be shipped in its original packaging unless ordered with other items. When shipping orders with this item, we will split this item into it's own parcel. Not that you can set the maximum quantity required for splitting in Global settings > Shipping > Split ship-ready items. E.g. if the setting is set to 10 and an order comes in for quantity 20 of this item, we will not created 20 parcels, but if order quantity is 7 - we will create 7 separate parcels.
- Box - click Set if you would like to assign a default item box, so when an order is placed for this product, Jazva will automatically select this box option. Boxes can be found under Inventory > Supplies > Boxes.
- Extra Boxes - if this item ships in multiple parcels, click on the "+" button and add additional boxes. Specify "Ship Ready" if that additional box should ship by itself. You can add as many additional boxes as needed. If they are marked ship ready, we will create multiple parcels during shipping of a single product.
*By default the L * W * H are the product dimensions. But if ship-ready is enabled, then Jazva will consider those dimensions as the box dimensions.
Click Save to record your changes.
Vitals
The Vitals section gives you an overview of the product’s basic information. It can be found on the top right corner of every product page.
You can add notes in this section by clicking the pencil icon next to “Notes”.
Categories
Categories can be assigned to products within the Categories section. Visit Managing Categories to start building your category tree.
- You can add existing categories by searching for them in the Add field.
- Departments and Brands are main categories by default. You can add subcategories by entering text next to these main categories.
Bullet Points
You can add bullet points to appear on your listings, and they will appear on different sections depending on the marketplace.
- From the Product Bullet Points section, click +Add to add a new bullet point.
- Enter the desired text in the text field.
- Click Save to complete.
For a more in-depth guide on product and item-level bullet points, please visit Managing Bullet Points.
General bullet point best practices for Amazon:
- There's a 5 bullet limit, so create five attributes in your inventory labeled Amazon Bullet Points 1 – 5.
- Each bullet has a 500 character limit, but most people skim through the text. Make sure each point is keyword-rich, descriptive and readable.
- Capitalize the first letter of each bullet point. No need to end each point with punctuation.
- Begin your points with the most important and eye-catching features. Try to use some keywords not mentioned in the product title.
- Focus on benefits instead of only describing the features.
Relationship Groups
These are used exclusively for Jazva web stores for the purpose of upselling through related items and add-on products. Please visit this article for a detailed guide: Product Relationships: Grouping Related Items & Add-Ons in Your Jazva Web Store
Updating Product Setup
A product’s Setup tab allows you to set the titles and descriptions, variation options, and other optional settings.
Titles and Descriptions
Please use Listing Profiles, Titles and Descriptions for reference as not all sales channels support these options.
- Open an existing product.
- Click the Setup tab.
- Under General, you will be able to modify the base product Title, Main Description and Short Description if applicable for the channel.
- If you need to edit each item title or description, click Show Item Descriptions. This will allow you to edit all variations within the base product.
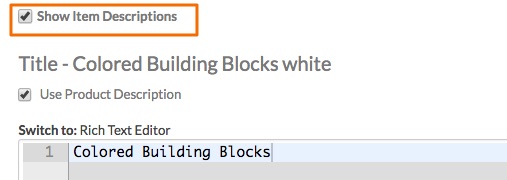
- You can also click Switch to: Rich Text Editor for more advanced editing options.
- Click Save to finish.
Advanced Options, Attributes, and Soft Options
This section will help you understand all available settings within the Setup tab, but are largely optional.
- Open an existing product.
- Click the Setup tab and scroll down below the General settings.

- Many of these advanced settings here, such as Keywords and Popularity Boost, are optional.
- Tax Class is used if you want to assign a different tax rate, such as wholesale rates, at the product level. Visit Sales Tax for details.
- SEO is only used for Jazva web stores.
- On the right panel of this screen, you can add traits such as attributes and soft options, enabling you to create variations of the base product.
- In the Attributes section, click the Add drop-down menu and select attribute sets to attach to the product.
- In the Soft Options section, click the Add drop-down menu and select soft option sets to attach to the product.
- Click Save to complete setup.
Please visit Variations, Product Attributes & Soft Options for a more detailed guide.
Comments
0 comments
Article is closed for comments.