This article covers all of the aspects of inventory reordering, from manually creating POs to setting up automatic reordering based on projections.
Contents:
- Overview
- Best Practices: Products, Vendors, Reorder Points and Projections
- Creating a PO and Adding Items Manually
- Distributing a PO Across Multiple Warehouses
- Importing a PO or ASN from a Spreadsheet
- Understanding Projections
- Setting a Reorder Quantity and Reorder Point
- Creating a PO Based on Calculated Projections
- Creating a PO Based on a Simple Sales Data Calculation
- Fully Automating the Process
- Eager Warehouse Reordering
Overview
Inventory reordering is one of the key parts of any ecommerce business. The importance of optimized inventory levels cannot be underestimated. In the age of shared marketplaces and repricers, a retailer’s success depends on having enough inventory at hand to turn in profits, while at the same time, reducing stale and excess inventory.
One of Jazva’s core features is the support of multiple levels of inventory purchasing. From manually creating POs to fully automated forecast-based reordering, you can easily manage procurement in Jazva.
Jazva also distinguishes Standard POs from Advanced Shipping Notices. An Advanced Shipping Notice (ASN) is a record of expected shipments that have no bearing on your financials or payables. This allows you to keep track of incoming shipments or samples that are different from Standard POs.
Best Practices: Products, Vendors, Reorder Points and Projections
Each product or item variation in Jazva requires a primary vendor assigned to it, which can be set in the product’s details page. Additional (secondary) vendors can also be added to each item.
The most basic way to order a product is to create an empty PO or ASN and add each item one manually. If an item has a pack size other than 1, then Jazva will round up each ordered line item to a case-pack size.
POs and ASNs can also be uploaded from a spreadsheet.
A more advanced way to reorder is to auto-generate a PO and let Jazva pre-populate it with suggested line items. When auto-generating, Jazva will do either of the following:
- Pick a predefined reorder quantity for the particular item if the current quantity at hand is below the minimum reorder point. This will only be done if you override the reorder quantity and reorder point from the item’s detail page.
- If a reorder point and reorder quantity are not specified, Jazva will use its own projections for each active item to calculate the necessary reorder quantity. All you need to specify is how many days of safety stock you want to order.
Auto-generated POs can be manually modified before they are submitted to the vendor.
Creating a PO and Adding Items Manually
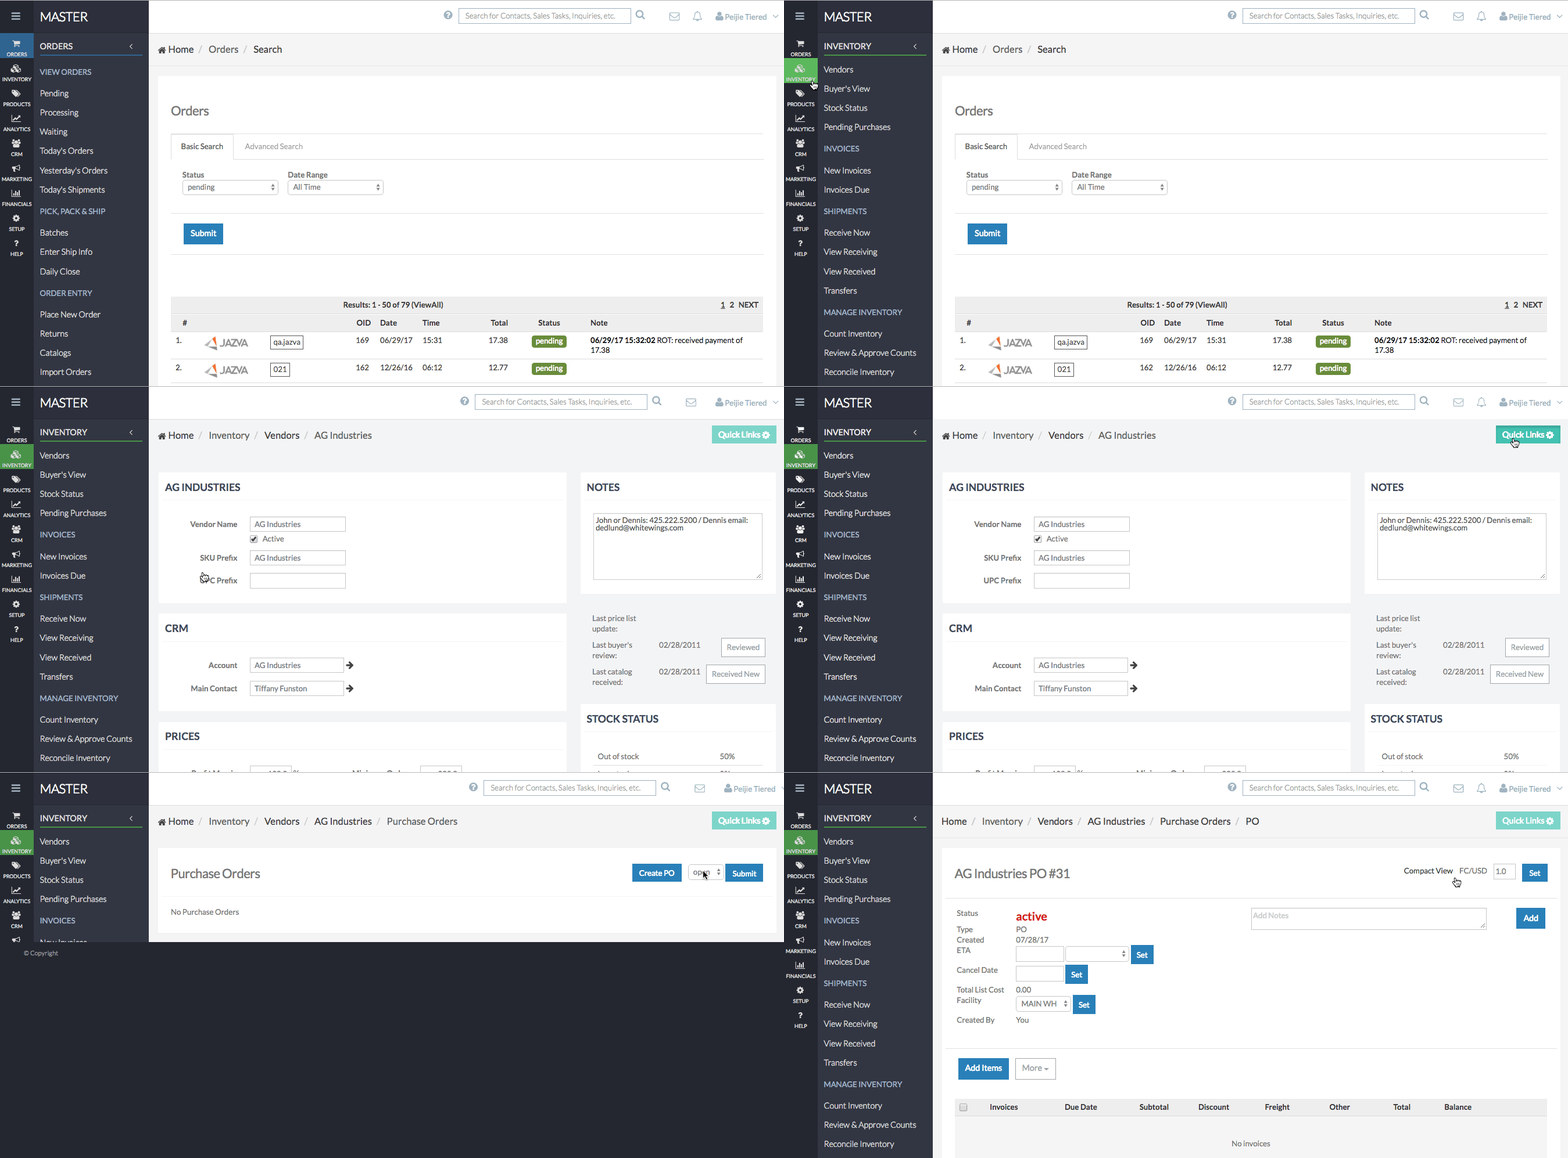
- From the main menu, navigate to Inventory and select Vendors.
- Choose the vendor you want to purchase from.
- Click Quick Links and select Create PO.
- A PO will be created with a new PO number.
- Complete the form with the pertinent purchase order information:
- Select an ETA date for the order from the date-picker and click the set button (optional).
- Select a cancel date for the order from the date-picker and click the set button (optional).
- Click Add Items.
- Search for items by SKU or title and click Find.
- You can also create new items by clicking new product and completing the product form. Click save & order to save it to your PO.
- Enter the quantity of the items to order.
- Click Submit to add the line items.
- Click Set from the upper right corner to finalize the items.
- To make additional changes, click Update.
- You also add internal notes to the PO in the Add Notes section.
- Once you are ready, click Send Now and the purchase order will be emailed to your vendor.
Note: Advanced Shipping Notices (ASNs) are also created in the same process outlined above. Simply select Create ASN instead of Create PO on step 3.
Distributing a PO Across Multiple Warehouses
Jazva allows you to distribute inbound PO inventory across your warehouses. Reorder Weight can be assigned to your facilities, so when you split a Purchase Order, the inventory will be distributed accordingly, in proportion to each facility’s current stock levels.
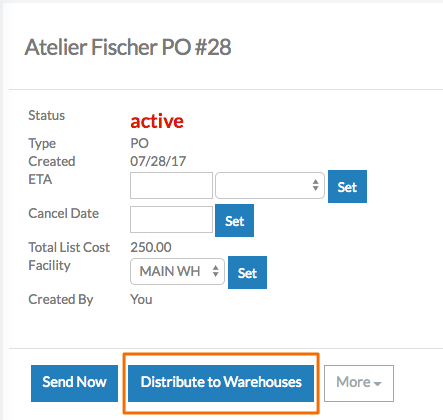
- Simply go to an active PO.
- Select Distribute to Warehouses. This will divide the PO and assign it to multiple warehouses.
- You can adjust the Reorder Weight, which must total a percentage of a hundred. Jazva will take into account current stock levels when distributing the inbound inventory.
- For example, if you have two warehouses with reorder weights of 50% each, and your first warehouse has 20 items in stock, reordering 40 pieces will be distributed as 10 pieces in first PO, and 30 pieces in second PO. This will ensure you have equal stock in both warehouses (30 pieces each) after POs are received.
Importing a PO or ASN from a Spreadsheet
If you already have a PO or ASN in an Excel file, you can upload it easily in Jazva.
- From the main menu, go to Inventory and select Vendors.
- Choose the desired vendor.
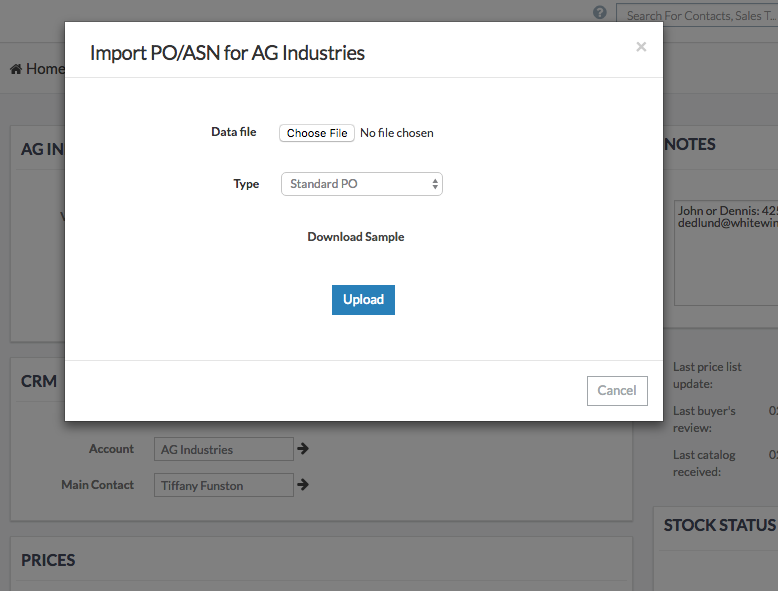
- Click Quick Links and select Import PO/ASN.
- From the dialog box, click on Download Sample. Copy-paste your data onto the template and make sure your data is mapped correctly.
- From the Data File section, click Choose File to upload your template.
- Select Standard PO or Advanced Shipping Notice under Type.
Click Upload to complete the import.
Understanding Projections
Aside from manually creating POs or importing ones from a spreadsheet, Jazva lets you create POs with automatically calculated items based on your pre-set reordering levels, or Jazva’s calculated projections per item.
By default, all reorder points for products are set to “Auto” in Jazva. This way, Jazva will use its own projections engine to dynamically calculate the proper reorder points for each item.
Every night, Jazva recalculates the projections for each active item in the system based on the order history available for the product and similar items.
To view the current projections for the product:
- Perform a product search and open an existing item.
- Click the Statistics tab and select Projections from the drop-down list.
You will see projections for each channel (store) and each variation of the product for the next 3 months, months 4 to 6, and months 7 to 12.
Jazva takes into consideration seasonal spikes and attempts to predict demand based on all available order history.
Setting a Reorder Quantity and Reorder Point
If you do not want to use Jazva’s calculated projections, you can pre-define your reordering levels for each item.
A reorder point is the number in which a reorder would be triggered. For example, “reorder point: 50” will send a reorder if current stock falls to 50 or below.
Reorder quantity is the minimum amount of stock you wish to reorder once the reorder point is triggered.
Follow these steps to manually override these values:
- Perform a product search and open an existing item.
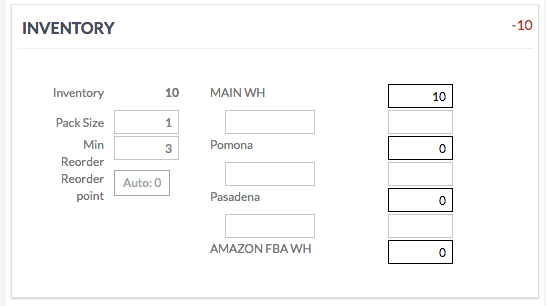
- From the Item Details page, scroll down to the Inventory section.
- Set a Min Reorder quantity you want to order if the quantity at hand falls below the reorder quantity. Set a quantity in Min Reorder to specify the quantity you want to order if the current quantity at hand falls below this reorder quantity.
- Click Save to set your Min Reorder quantity.
- If you’d like to override the reorder point, click on Auto next to Reorder Point.
- In the Reordering dialog box, set a Manual reorder point. This number will override the default reorder point based on projections.
Creating a PO Based on Calculated Projections
There are two ways to create a PO with auto-generated line items. The first is from the Vendors page:
- From the main menu, go to Inventory and select Vendors.
- Click on the vendor to access its profile page.
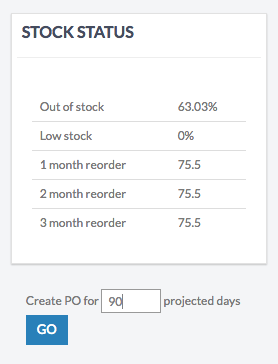
- Below the Stock Status section, modify the number of days in the “Create PO for __ projected days” field to a desired number of safety stock level.
- Click Go to auto-generate a purchase order.
- Jazva will create a PO for that vendor, with SKUs and quantities either based on your manual reorder point, or if not specified, based on automatic projections.
- The status of the PO will be set to “active.”
- You can freely adjust quantities or add/remove items from the PO.
- Once complete, you can click Send to send the order to the vendor via email.
Creating a PO Based on a Simple Sales Data Calculation
If you do not want to use Jazva's automatic forecasts, you can also reorder inventory using a simple calculation based on past daily sales data. This alternative projection can be used to reorder quickly, without accounting for performance history, seasonality and other factors.
This is accessed from the vendor Stock Status report.
- From the main menu, go to Inventory and select Stock Status.
- A listing of all your vendors with current stock status will be displayed.
- Each vendor will be presented with raw data, presenting the most vital information about the vendor:
- Inventory - Current inventory at hand (total value)
- Out of Stock - SKUs out of stock for the vendor
- Payable - Accounts payable value for the vendor
- Ordered - Amount ordered
- Backorders - Amount on backorder
- Automatic Forecast (Auto N) - Amount needed to reorder based on the “stock days out” safety stock time.
- Simple Calculation (X days x Y) - This calculation uses a simple formula based on the average daily sales of a specific date range, multiplied by any amount you would like to use
Both Automatic Forecast and Simple Calculations can be adjusted by clicking on their column headers. Modifying these values will also update your inventory global settings.
Click on the Simple Calculation (X days x Y) formula in the column header to adjust the reorder quantity.
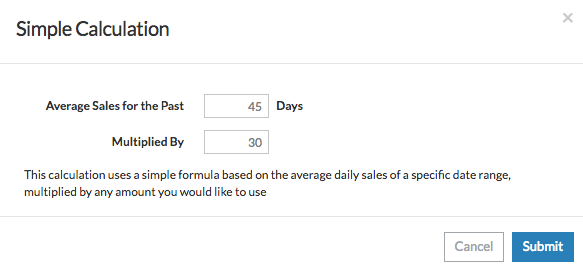
After adjusting your reorder calculation, go back to the report and click Reorder to create a new PO.
You can then update your item quantities based on either the automatic forecast or simple calculation by clicking on the item quantity you would like to reorder.
Fully Automating the Process
Once Jazva is adjusted to your buying preferences, you can start scheduling automated POs to be sent out automatically to your vendor if certain conditions are met.
- From the main menu, go to Inventory and select Vendors.
- Click on vendor to access its profile page.
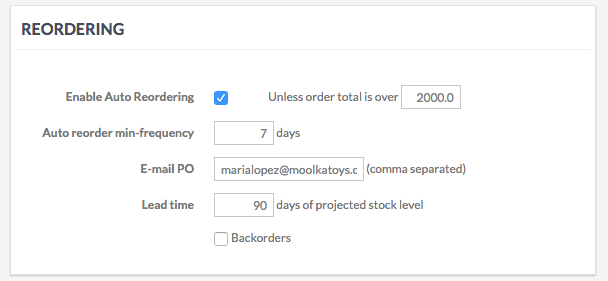
- Scroll down to the Reordering section and tick Enable Auto Reorder to enable auto reordering.
- To set a max PO cost value to be automatically sent to the vendor, populate the dollar amount in the “Unless order total is over” field. By setting a value in this field, you will prevent Jazva from auto-sending a PO if the projected total is more than the specified value.
- Set a minimum frequency of PO in “Auto reorder min-frequency” to populate the minimum number of days between two POs.
- This will tell Jazva to hold back a PO if another PO was sent to the vendor sooner than the number of days populated here, and send it later when this condition is met. This prevents creation of daily small POs sent to the vendor.
- The default value is 7 days, meaning automated POs will go out to vendors once a week, and no PO will be created if nothing is needed.
- Set the Lead Time to the number of days of projected stock level.
- This is essentially the value that controls the amount of reordered product. A simplistic way to explain how it works is as follows:
- Let's assume a product “xyz” currently has an available inventory of 10 and also has 20 on backorder with the vendor (on the way to your warehouse)
- Jazva projects that it will sell 40 within next 90 days and 200 within the next 90 days (due to high season starting after 90 days).
- If the vendor's "lead time" is set to 90 days, Jazva will try to have a total 40 in stock. To achieve it, an automatic PO will be created with the quantity of 10 (40 - 10 - 20).
- If vendor's "lead time" is set to 180 days, Jazva will try to have total 40+ 200 = 240 in stock, so the automatic PO will be created with quantity of 210 (240 - 10 - 20).
Eager Warehouse Reordering
You can also configure your system to eagerly reorder inventory for each warehouse that has a quantity lower than their portion of the reorder point, regardless of stock levels in your other warehouses.
For example,
- If your facility’s reorder weight is 80 vs 20, and item's reorder point is set to 200, then the warehouse1 reorder point will be 160, and warehouse2 reorder point will be 40 (portions of 200).
- So if warehouse1 has 1000 and warehouse2 has 10, then it should reorder 30 for warehouse2, after distribution.
To enable this setting,
- From the main menu, go to Setup > Global Settings and select the Inventory tab.
- Mark the Eager Reordering setting, and click save.
Your warehouses will also need to have reorder weights defined on each Facility Setup page. Simply update the relevant facilities as needed.

Comments
0 comments
Article is closed for comments.