
Optimize your warehouse by creating an effective labeling system.
Contents:
- Basic Terminology
- Naming and Organizing Your Location Labels
- Creating Bin Locations
- Printing Location Labels
- Setting Location Priorities
Basic Terminology
- Warehouse name - same as your facility name.
- Bin location - a designated inventory storage location in your warehouse.
- Location label - the label to be sticked on your bin location.
Naming Your Bin Locations
Labeling your bin locations correctly is essential to your distribution operations. The more logical and concise, the easier and faster it will be for your warehouse team to pick product.
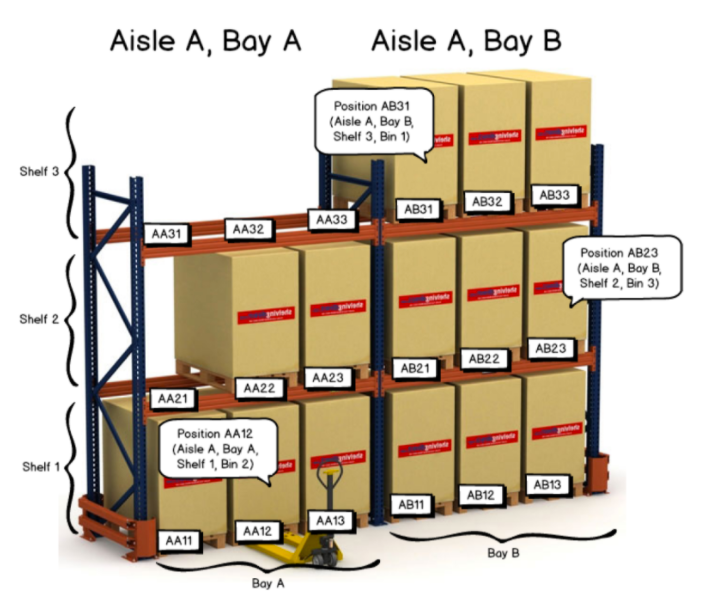
Bin locations are typically organized by zones, aisles, bays, shelves and bins.
Some examples of bin locations include:
- A7-10-3-5 (Zone A, aisle 7, bay 10, shelf 3, bin 5)
- BD73 (Aisle B, bay D, shelf 7, bin 3)
- E1-10 (Aisle E, bay 1, shelf 10)
Zones and bins are optional, but whichever naming convention you decide upon, we recommend sticking to that pattern to ensure consistency across your bin locations.
Here are the best practices on creating an effective labeling system:
- Bin locations should be named as short and easy to read as possible. Avoid using special characters such as “_” “,” and the like.
- We recommend using a combination of numbers and letters such as “AB25” or “A1NZ2”. This way, location labels will be noticeably different from SKUs or VIDs.
- The smallest unit (bins) will often have multiple products mixed in one location, so make sure that these bin units are reasonably small so that product can be easily found by a warehouse worker. In any given location, the picker should be able to find the item with the correct SKU within 15 seconds.
We recommend that all location labels are organized from their biggest unit (zone if you have zones, if not, an aisle) to the smallest unit (bin) For example:
- If you divided your warehouse into zones, the first position is the zone.
- The second position is the aisle. Each surface of the aisles in your warehouse should be labeled as A through Z. Make sure to label each surface of an aisle as a different letter.
- The third position should then be the bay (also known as a column). The bays in each aisle should be labeled A-Z.
- The fourth position should be the level of the shelf (generally numbered from the left corner, ground up).
- The fifth position should then be the bin number on that shelf, from left to right. Make sure to put the labels for bins on the left side of the bin space, that way the stickers will act as a divider on the shelf.
An example from a warehouse without zones: BD75 means Aisle B, Bay D, 7th shelf from bottom, 5th bin from the left.
An example from a warehouse with zones: ABC12 means Zone A, Aisle B, Bay C, Bottom Shelf, 2nd bin from the left.
Creating Bin Locations
Bin creation involves importing inventory via spreadsheet. The fastest way to create bin locations in bulk is to update them with inventory counts.
Please note that before you can use the Import Inventory feature, you must have at least 1 existing Generic Product Import Wizard. Please visit Importing Inventory Counts and Bin Locations for more details.
- From the main menu, navigate to Inventory > Manage Inventory and select Import Inventory.
- Select any Generic Product Import Wizard.
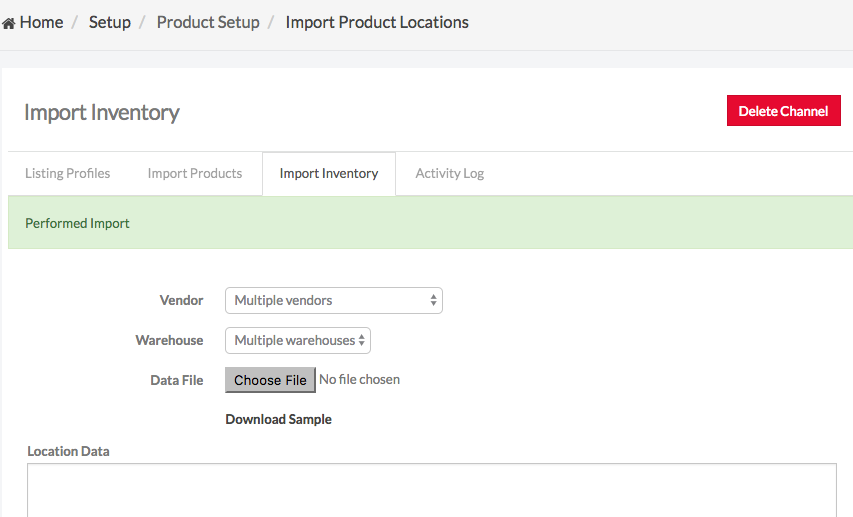
- From the Import Inventory tab, select a Vendor or leave it as Multiple Vendors.
- Selecting a vendor is only to update the location for products from the specified vendor. So, if your file has products from multiple vendors, only the products from the specified vendor will be updated.
- Select a Warehouse.
- Click Download Sample to retrieve the Import Inventory template.
- Fill out the spreadsheet with your location data, including IID, quantity and location, etc.

- Upload your data.
- From the Data file section, click on Choose File and upload your spreadsheet.
- Alternatively, you can copy-paste your values directly on the Location Data text box.
- Select one of the two options on stock quantity:
- Set stock count to quantity - this option overrides your existing stock data.
- Increment stock by quantity - this option adds to the current stock data.
- Click Verify.
- Review the data and make sure that column headers are mapped correctly.
- Click Import to complete the process.
Printing Location Labels
Here are instructions on how to print out location labels. Before printing labels, you will need to configure your printers to work with Jazva.
First, go to Inventory > Manage Locations and select Print Location Labels.
To print a range of locations, simply specify the first and last bin location, separated by a colon (:).
For example, if you enter A11:B22, Jazva will print 24 labels -
A11, A12, A13, A14, A15, A16, A17, A18, A19, A20, A21, A22
B11, B12, B13, B14, B15, B16, B17, B18, B19, B20, B21, B22
You can also use a comma (,) or dash (-) as a divider between two components. The comma will not be printed.
For example, if you enter A1,1:B2,2, Jazva will print 8 labels -
A1,1, A1,2, A2,1, A2,2
B1,1, B1,2, B2,1, B2,2
If you enter D1-1:E2-2, Jazva will print 8 labels -
D1-1, D1-2, D2-1. D2-2
E1-1, E1-2, E2-1, E2-2.
You can also print multiple ranges, by listing one range per line.
For example, if you enter
A1,1:B2,2
D1-1:E2-2
Jazva will print the following 16 labels:
A1,1, A1,2, A2,1, A2,2
B1,1, B1,2, B2,1, B2,2
D1-1, D1-2, D2-1. D2-2
E1-1, E1-2, E2-1, E2-2
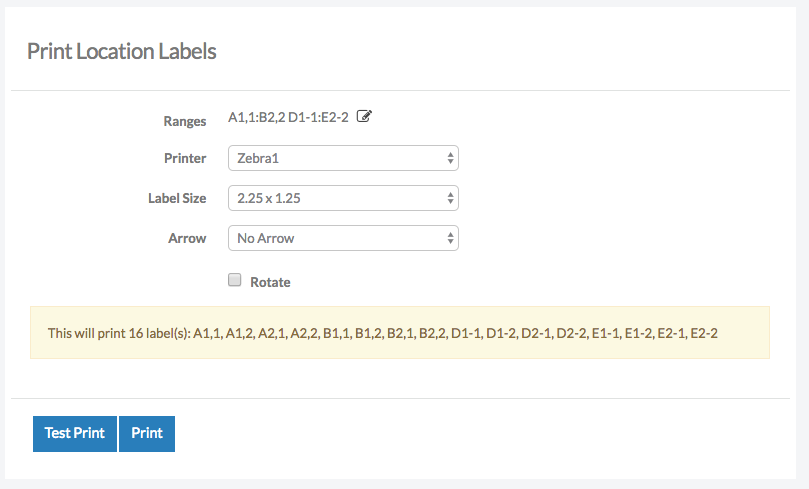
Before you print the labels, you can perform any of the following options:
- Ranges - click the edit icon to reset the location range.
- Printer - change the printer if needed.
- Label Size - adjust the label size.
- Arrow - location labels can have arrows printed out to signify if the location is on the upper or lower side of the shelf.
Test Print - run a test print, which will print only the first location label of the range.
After printing your locations, we suggest that you affix them to the bottom left corner of the corresponding bin/shelf for consistency and accuracy.
Setting Location Priorities
Bin location priorities can be changed manually in Jazva or by scanning location labels.
When an order is made, Jazva will pick inventory from the location with the highest priority. The default is 20000 and the highest priority is 1.
Editing a Location Priority Manually
- From the main menu, navigate to Inventory > Manage Locations and select Locations.
- Click on the bin location you wish to edit.
- Look for the the Priority text field. Enter a priority number.
- Click Change to update your settings.
Setting Location Priorities in Bulk
You may also assign priority to locations by scanning the location labels.
- From the main menu, navigate to Inventory > Manage Locations and select Priorities Setup.
- In the Starting Priority text field, enter a starting value.
- Scan your location labels one by one. Start with the location that should have the highest priority. The system will then assign a priority to the location. For example, if the starting value is 1, then scanning a location will assign it with a priority of 1. Scanning the next location will assign a priority of 2, so on, and so forth.
- After scanning all location labels, click Submit.
Comments
0 comments
Article is closed for comments.