Learn the best practices on picking and shipping orders.
Contents:
Printing Pick Lists
You can select how and when pick lists and invoices are printed - whether automatically in batches, or manually by individual order or batches.
Individual Order Printing
- Open an existing order.
- From the Invoices section, click the Document icon to generate an invoice and packing list.
- You may select a document template to use from the drop-down list next to the icon.
- Proceed to picking and packing the items.

Batch Printing
- From the main menu, go to Orders and select Batches.
- Select a batch to print. To learn more about this process, please review Batches.
- Click Print. You may also select orders within the batch to print them individually OR resubmit the batch to only display orders from a specific channel by clicking the drop-down list next to Print and selecting a channel.
- Proceed to pick and pack the items.
Shipping Orders
Once you have the products packed and ready at the shipping station, you can begin shipping out your orders.
- From the main menu, go to Orders and select Enter Ship Info.
- Open an order’s shipment page by clicking SCAN HERE and then scan the barcode on your pick list. If you do not have a scanner, manually type in the ID number found above the barcode (Shipment ID) that is preceded by a “+” (e.g.+123456).
- If product weights are not updated in your system, scan the weight of the parcel using the provided weight barcodes. Make sure that when you scan the weight, the cursor is in the SCAN HERE field (if you do not have a scanner, manually enter the shipment weight into the Weight field. Keep in mind that all weights should be in pounds).
- Enter the Picked quantities or select Pick All from the drop-down list next to Add Parcels. If Order Packing Verification is enabled for this particular user, scan the items for the order to confirm that the correct products have been picked.
- Change the shipping mail class as needed (keep in mind that Jazva automatically selects the most cost-effective method that meets your customer's selected time criteria during checkout. To check the updated price for another shipping method, set the shipping method and click Update).
- Once you have verified the items and made your preferred changes, scan the EXP barcode provided or click Done.
- The shipping label will be purchased and tracking information will be automatically updated.
- Click the Printer icon to print the shipping label.
- Attach the shipping label to your parcel and it is ready for delivery.
Upon scanning the EXP barcode or clicking Done, Jazva will charge the payment source (if it has not been previously charged). This helps ensure that you will not ship an order that has not been paid for. If you have given your customer payment terms, their payment source will not be charged until the agreed-upon date.
Additional Shipping Options & Insurance
You may set other options for your parcels, which make use of certain services your shipping carriers may offer.
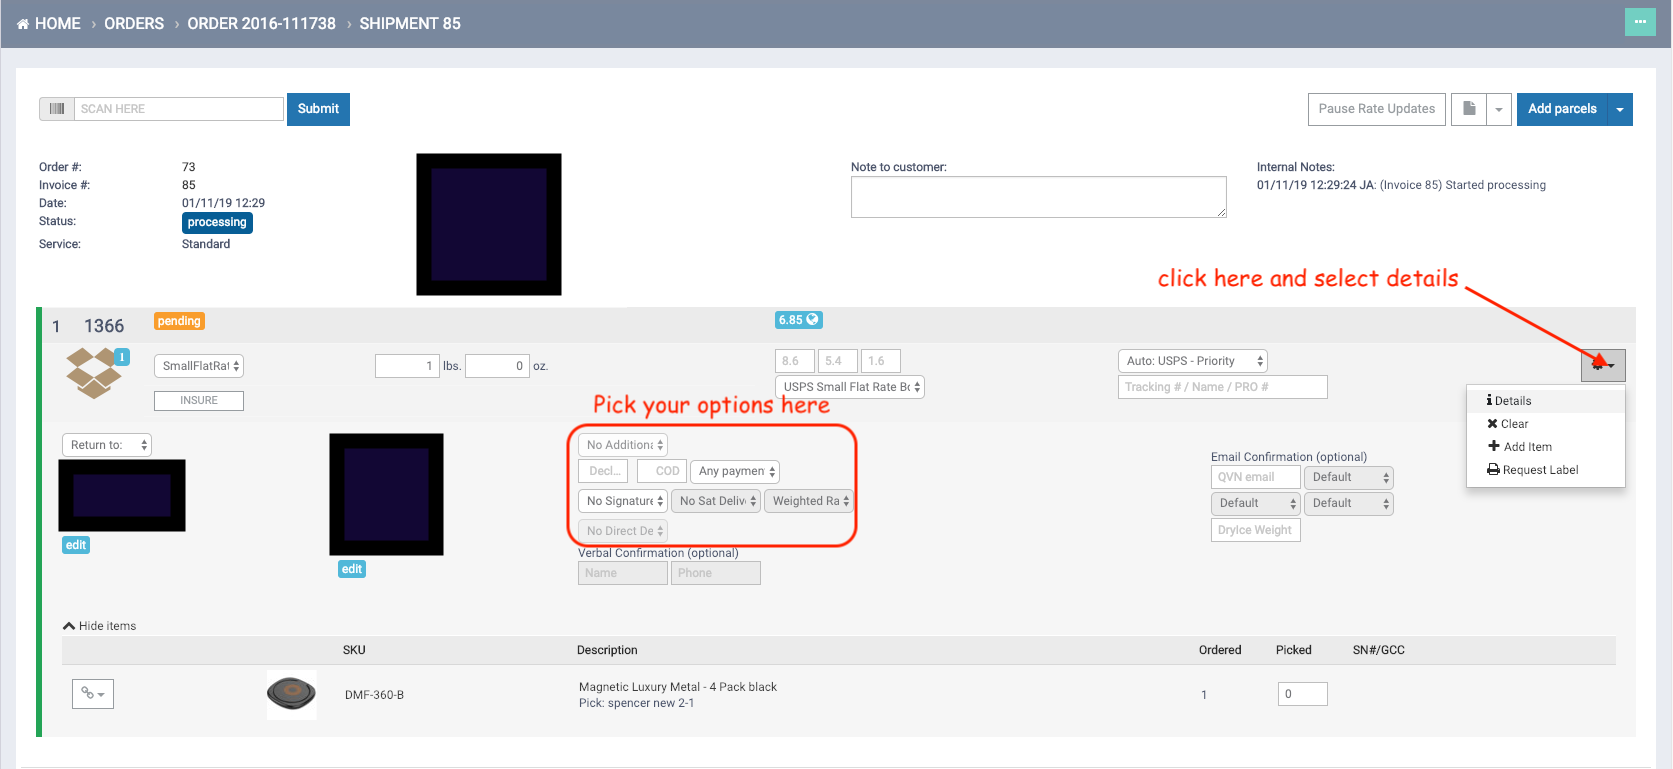
- From a parcel, click the Gear icon and select Details. This will display the additional options.

- Configure the available options as needed.
- Declared Value - sets the parcel to have a declared monetary value for insurance purposes. Entering a value here will automatically acquire insurance from qualified shipping carriers. Note: Purchased insurance amount will not be displayed on the screen only Declared value amount
- COD - sets the parcel to require payment on delivery.
- Signature Required - sets the parcel to require a signature upon delivery.
- Sat Delivery - sets delivery to be allowed on Saturday or not.
- Direct Delivery - sets the parcel to make use of UPS Direct Delivery.
- Click Update to save.
Shortcut Barcodes
A series of barcodes are available to help you cycle through your shipping processes much faster, simply by scanning them.
By scanning these barcodes, certain actions can be performed without having to click buttons or enter data in the system. For example, to begin scanning (picking) items for another parcel, you would normally have to click buttons to create a new one and then scan for it. Or to pick all items for the order, you’d also need to click through the appropriate buttons.
With these shortcut barcodes, your warehouse staff can simply scan them with a scanner, and the functions above will be performed.
Download the Barcodes here:

Comments
0 comments
Article is closed for comments.