- Overview
- How to Enable Drop Shipping
- Adjust Drop Ship Emails
- Add the Drop Ship Vendor in Jazva
- Set Up the Vendor for Drop Shipping
- Setting Items for Drop Shipping
- Controlling Drop Ship Inventory Settings
- How to Disable Drop Ship Inventory
- Drop Shipping with In-House Inventory
- How to Drop Ship Kits
- Manually Drop Shipping Kit Components
- Manually Sending Drop Ship Orders
- How Drop Ship Orders Are Updated
Overview
Dropshipping is a way to get into retailing without inventory risk. Instead of keeping your own warehouse of inventory, you partner with a supplier, also known as a dropship vendor. The dropship vendor stocks its own inventory, you transfer customer orders and shipment details to them, and they ship the goods directly to the customer.
Before you use a dropshipper for customer orders, do a few test orders to make sure the supplier ships its packages on time, sends the right products, and so on. Evaluate their technology, location, staff, and efficiency to make sure it up to your standards.
Setting up a dropshipper in Jazva involves a few steps: setting up email settings, assigning a dropship vendor, and editing your item’s settings.
How to Enable Drop Shipping
1. Adjust Drop Ship Emails
The first step is to add an email where drop ship orders will come from.
- From the main menu, go to Setup and select Global Settings.
- Toggle to the Email tab.
- From the email_dropship_from, enter the email address where your drop ship orders will be sent from.
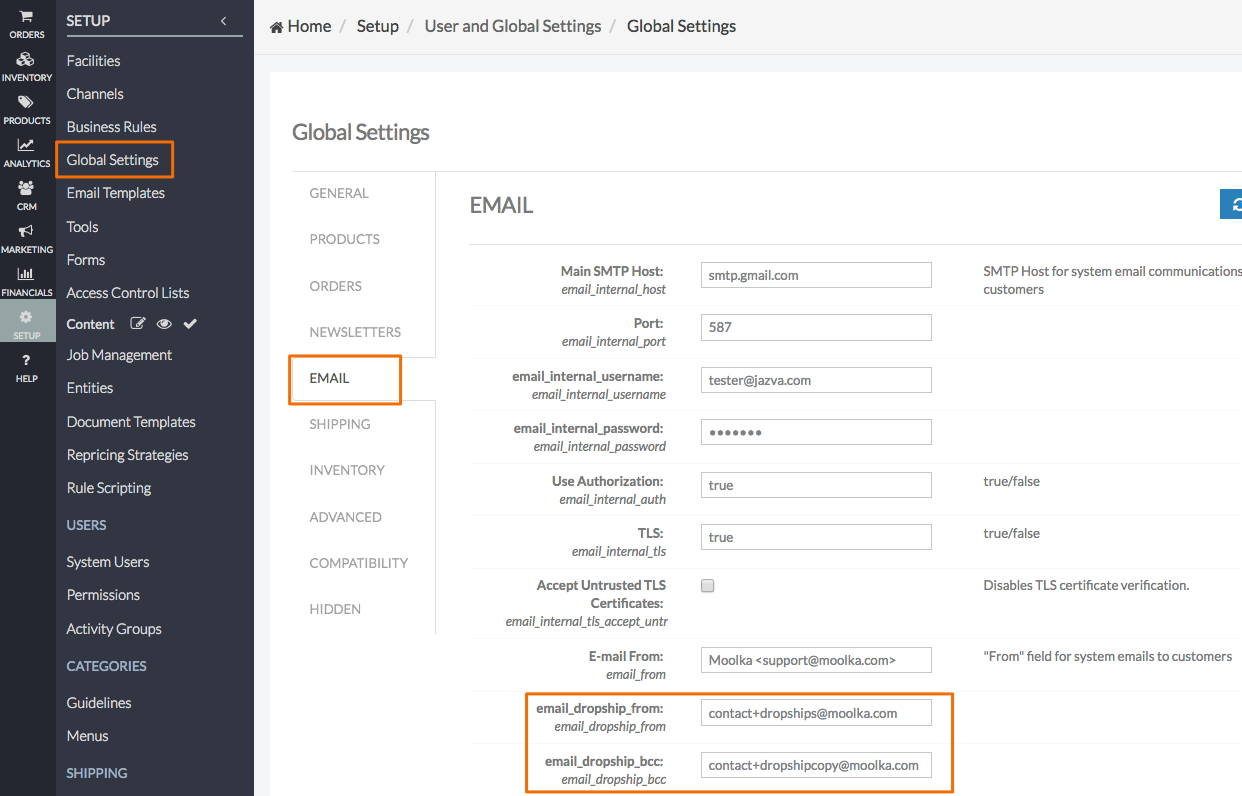
You can also include your email address in the email_dropship_bcc field to get a copy of all dropship orders being sent out from the system. This will help you to see how dropship order emails appear or to know when emails are being sent out. You can include multiple email addresses by separating them with a comma.
2. Add the Drop Ship Vendor in Jazva
- From the main menu, go to Inventory and select Vendors.
- Click Add Vendor from the top right corner.
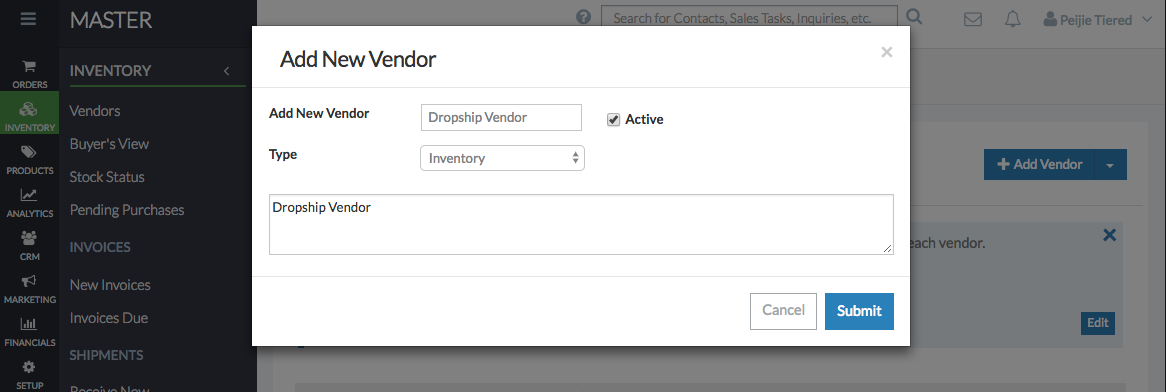
- Complete the form in the dialog box:
- Title - the Drop Shipper's company name.
- Set the company to Active.
- Leave type as Inventory.
- Enter any notes or comments about the vendor, such as “Drop Shipper”
- Click Submit.
3. Set Up the Vendor for Drop Shipping
- From the vendor’s page, scroll down to the section titled DROP SHIPPING.
- Set your settings as desired:
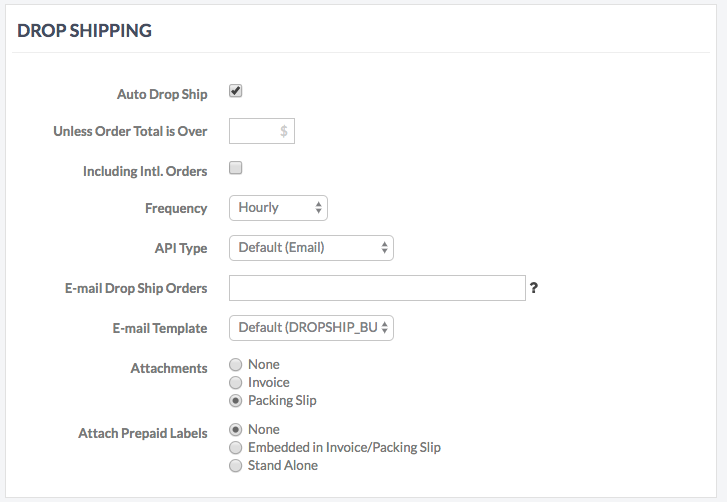
- Auto Drop Ship:
- If this is not selected, any orders that come in that are to be drop shipped by the vendor will need to be manually sent from the Order Summary Page (See: Manually Sending Drop Ship Orders).
- If selected, you can have orders automatically sent to the vendor. You will need to specify the following options:
- Unless order total is over - Leave blank to send all dropship orders for this vendor. Otherwise, enter an order amount to prevent orders of high value to be sent automatically.
- Including intl. orders - Set if drop shipper will handle International Orders automatically.
- Frequency - Set how frequently you wish to have orders sent to drop shipper.
- Auto Drop Ship:
- API Type - Set how drop ship orders are sent to drop shipper. Default (Email) is most commonly used.
- E-mail drop ship orders - Specify the email address where drop ship orders will be sent too. You can include your own email address here as well to see how dropship order emails appear or to know when emails are being sent out. Just be sure to separate between email addresses with a comma.
- Email Template - Select the email template to be used.
- Attachments - Select which document to send out to your drop ship vendor. Selecting Packing Slip will include the order’s packing slip in the dropship order.
- Attach Prepaid Labels - Specify if labels will be generated from Jazva and attached in the email order being sent to drop shipper. Other than sending a separate letter size or 4x6 prepaid shipping label to your vendor, you can also choose to embed the label into the invoice or packing slip.
Setting Items for Drop Shipping
- Open an existing item that you wish to drop ship.
- From the item details page, mark the Drop Ship checkbox.
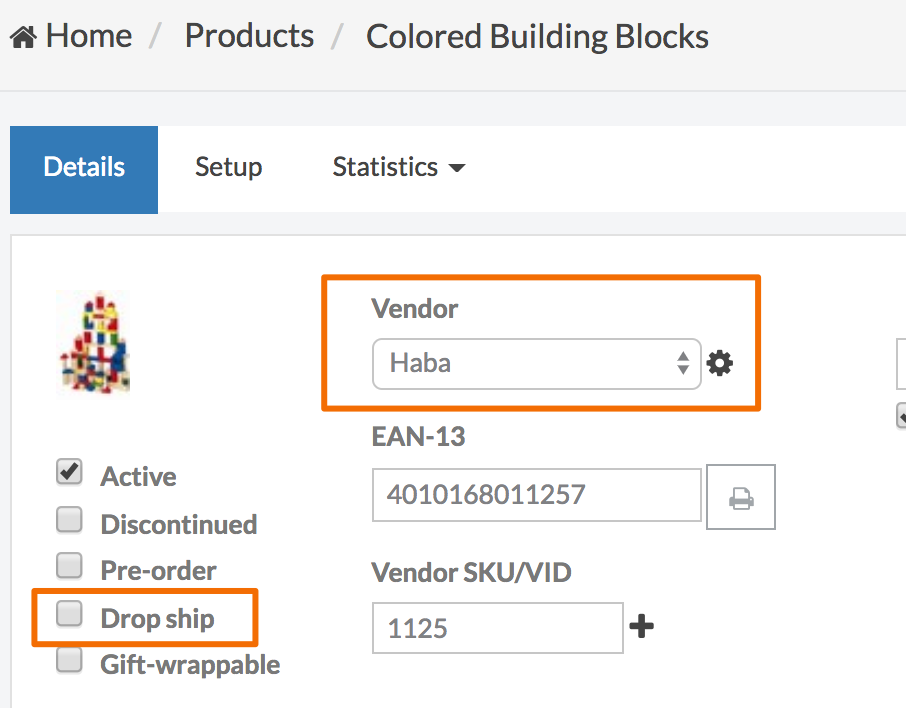
- Under the Vendor section, you can set up as many vendors as you’d like. Since Jazva acknowledges vendor inventory, we suggest setting up the item as multi-vendor. Click the gear icon to open the Multiple Vendors dialog box.
- Click + to add new vendors.

- You can also set up the vendor’s SKU, vendor-specific product Title, Cost, additional costs, and Inventory. Clicking on Drop-ship will enable or disable the use of this vendor when you have multiple drop ship vendors.
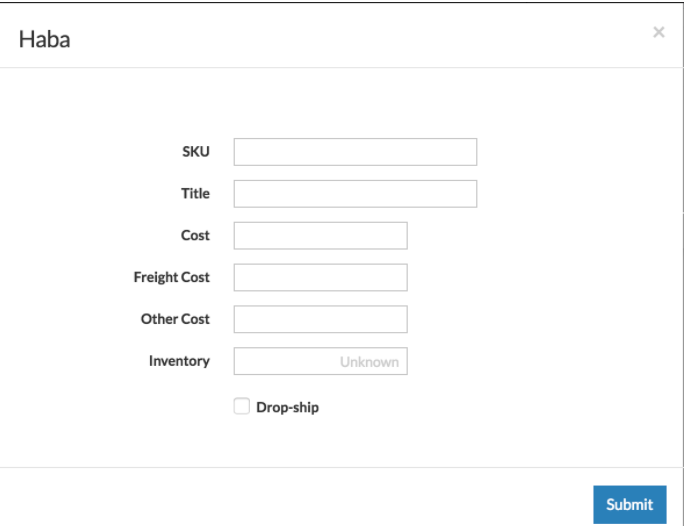
- Click Submit.
- Back in the item page, click Save.
*PLEASE NOTE: If the item still has in-house inventory, Jazva will continue to sell the item using your warehouse inventory before sending any orders to the drop ship vendor. See Drop Shipping with In-House Inventory below for more details.
Controlling Drop Ship Inventory Settings
Jazva gives you a lot of control on how drop ship inventory is tracked in the system.
How to Disable Drop Ship Inventory
If item is inactive, Jazva will push 0 inventory whether it is drop shipped or not. Simply unselect “Active” from the item Details page.
Drop Shipping with In-House Inventory
There may be instances where an item you want to drop ship still has existing inventory in your warehouse. For example, if you fulfilled an item in-house but later decided to discontinue internal fulfillment, you may set up drop shipping while still having existing inventory in stock.
If this is the case, Jazva will tell the channel that you have a combination of inventory. When an order comes, Jazva will use in-house inventory first until you no longer have in-house stock, before sending new orders to your drop ship vendor.
This is done to help clear your own stock and maximize profits.
How to Drop Ship Kits
Jazva allows you to drop ship kits. Vendor inventory will be tracked at the component item level. If you need to drop ship a kit from multiple vendors, we recommend letting Jazva allocate the inventory and dropshippers automatically.
If you want to limit a kit’s drop ship inventory to one vendor, follow the steps below:
- From the main menu, go to Setup and select Global Settings.
- Toggle to the Products tab.
- Select Count Kit Inventory Only Within Same Vendor. When enabled, Jazva will only acknowledge the kit's inventory if all component items are drop shipped by same vendor.

- Click Update All to save.
Manually Drop Shipping Kit Components
Kit component items can be manually converted to/from drop ship items within orders in Jazva. Each kit component can be assigned or reassigned to a drop ship vendor whenever you modify line items from an order.
Manually Sending Drop Ship Orders
If an order is not automatically sent to a drop shipper (due to the Auto drop ship option not being selected for the vendor or if the order total for the vendor was not yet met) the orders will remain in Pending status, regardless if a new batch is created.
Additionally, the order will have a red "D" tag on the orders list, indicating it is a drop ship order.

To manually send the order to the drop shipper:
- Open the order to be sent.
- There will be an indicator below each Line Item stating the Drop Ship Status.
- Switch to the Invoices tab on the Order Summary Page.
- Click the Drop Ship E-Mail Icon.
- The Drop Ship window will open. Review the information and make any modifications to the email list, subject, additional notes.
- Once complete, click Send Email.
- The order will now be sent to processing and the Drop Ship Status indicator on the Line Items will be updated to reflect the sent date.
How Drop Ship Orders Are Updated
When a drop ship order is sent to a vendor to be fulfilled, it is marked as “Processing” in Jazva. This order status means that the vendor should already be processing the order.
Depending on how the shipping label is acquired, the process of marking the order as “Shipped” will be different.
For Shipping Labels Acquired from Jazva
If the shipping label was generated from Jazva, the system will periodically check on the order’s tracking number status. Once the tracking number has a shipped status, the order will automatically be marked as “Shipped” in Jazva.
For Shipping Labels Acquired Outside of Jazva
If you acquired the shipping label outside the system, you will need to manually mark the order as Shipped in Jazva.
- Acquire the tracking number from your vendor or external source.
- Open the related parcel in Jazva.
- Enter the tracking number in the Tracking # / Name field.
- Click Update.
- Click Done, and the order will be marked as “Shipped."

Comments
0 comments
Please sign in to leave a comment.