Jazva has a configurable data feed system you can use to read orders, write inventory files, and transfer them to external servers. You can also configure feeds to write the results of reports configured with the Reports engine. The system allows you to map fields in Jazva to columns or XML elements and is designed to be flexible enough to support many kinds of files without requiring code changes in Jazva.
Contents:
Basic Functionality
- Order files can be read from servers over FTP, SFTP, or FTPS
- XML Order files can also be submitted via HTTP API to a Business Rule we have set up.
- Inventory files can be sent to servers over FTP, SFTP, or FTPS and can also be delivered via e-mail.
- We can write TSV, CSV, and Excel files
- We can read XML, TSV, CSV, and Excel files
- Feeds can be scheduled to run at periodic intervals
- You can create multiple feeds of the same type
A Note on FTP Servers
You can connect to an existing FTP server, but we have an FTP server available for you to use at datacenter.jazva.com. Currently you will need to request that we create an FTP account for you. You may specify any login name and password or allow us to generate a random one for you.
Companies and Feeds
Feeds are associated with your client accounts, which in Jazva are referred to as companies. Companies can be created and configured under CRM > Companies. Before you can create a feed for a client, you will need to set up a company for them.
Note: You can go to a company from almost anywhere in Jazva by typing in the company name in the search bar on the upper-right of any page.
One setting that will affect your Inventory and Order processing is the company’s Tier. The tier indicates which products are included in the client’s Inventory Feed and the template for the order packing slips printed with the order.
Once you have opened a company page, the data feeds associated with that company can be viewed in the Data Feeds section in the lower part of the right sidebar.
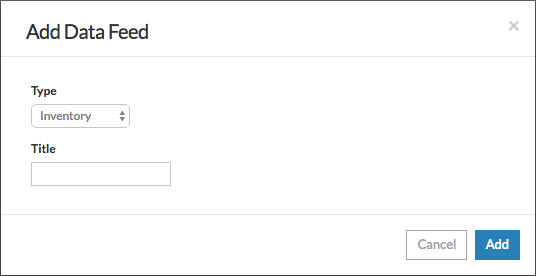
Click the Add Feed button to create a new feed. There are three kinds of feeds you can create: Inventory, Order, and Export Report.

Note: If you leave the title blank, it will default to the type of the feed. For example, the title will default to “Inventory” if this is an inventory feed.
For each feed, you will need to configure what data to read or write, where this data is going or coming from, and when to run the feed. The where and the when are set up in mostly the same way for all kinds of feeds.
General Feed Configuration
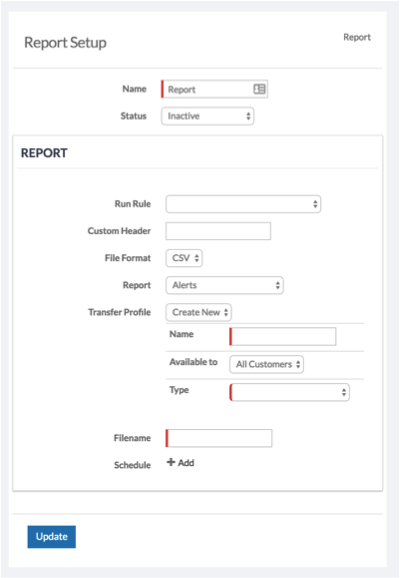
Depending on the type of feed you are configuring, there will be different options available. But some options are common to many feed types. Required fields are marked red on the side.
- Name is the title of the feed.
- Status indicates if this feed will be run, and whether it will perform write operations.
- Inactive: This feed will not be run.
- Read-only: This feed will run, but not perform write or delete operations.
- Active: This feed will run and perform all operations.
- Run Rule specifies a Business Rule to run before the feed is generated. You can use this rule to set variables available in the column setup.
- Custom Header applies to feeds we write. Normally the column names are used, but you can specify any arbitrary content here to use instead.
- File Format indicates the type of file we will read or write. We can read XML, XLS, CSV, and TSV and write XLS, CSV, and TSV.
- Transfer Profile specifies how we transfer the file to the server. This is described in the next section.
- Directory specifies the directory on the remote server to read or write files to.
- Filename is the pattern of the file names to read or write. For files we read, this can be a pattern (e.g. *.xml) and for files we write it is an EL Expression which can use variables or functions to customize the filename.
- Schedule specifies how often this feed is run. You can indicate it to run every day, hour, or minute. and specify the hour and minute within that period it is run. You can have multiple schedule entries to run a feed for example every hour at :00 and again at :30.

Transfer Profiles
All feeds require that you set up a Transfer Profile, which controls how the data is transferred. This is where you set things like the hostname, username, and password you use to connect to the remote server. You can reuse transfer profiles within the same client, and optionally, have it available to be used for feeds in any client in case the same credentials are used for multiple clients.
Any changes you make to the Transfer Profile will be saved together with the changes you make to the feed.
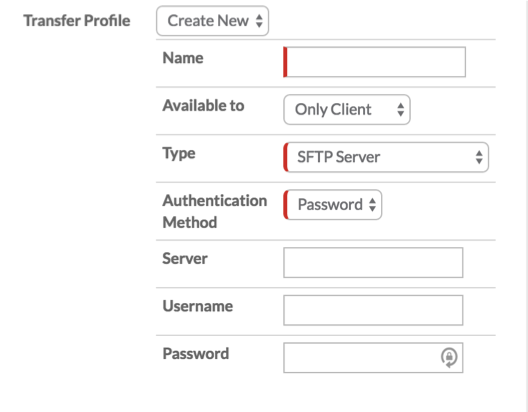
The drop-down next to Transfer Profile allows you to select an existing profile, or create a new one.
- Name is how the transfer profile is identified in the profile list.
- Available to indicates whether to include it in the Transfer Profile list of other clients.
- Type is the protocol we are using to connect. It can be FTP, FTPS, SFTP or Send E-Mail.
- Authentication Method only applies to SFTP. It can be Password or Server.
- Server is the host name of the server (FTP/FTPS/SFTP).
- Username and Password are the login credentials used to log in to the server (FTP/FTPS/SFTP).

E-Mail Transfer Profiles
If you pick an E-Mail Transfer profile you can set the subject line and destination e-mail address, but they are not part of the profile. They are set in each feed separately.
Running Feeds
If their status is Active, feeds will be scheduled to run automatically. You can see when they will be run next in the upper-right corner of the page.
You can also click Run Now to run the feed immediately, or Test Feed to generate the file that would be sent, but instead of sending it to the remote server, it will be downloaded for you to inspect.
Configuring Specific Feeds
While the when and the where setup is common to all kinds of feeds, the what varies depending on the feed type.
Report Feeds
Reports are configured in the Report Builder. For data feeds, you just specify which Report you will be running. The results of that report will be written to a CSV, TSV, or XLS file (configured as described in the general setup) and written to the remote server or e-mailed.
Inventory Feeds
Inventory feeds are CSV, TSV, or XLS files to write to a remote server or e-mail. You will select exactly what columns to include in the feed generated. If you have already configured another inventory feed and want to use the same columns, you can click “Copy Columns” and pick the feed to copy from instead of “Add”.
You can configure which items are included in the inventory feeds by setting up Tiers and Price Tags for this customer (this is documented elsewhere). Any product visible to this client will be included in the feed. You can always use the “Test Feed” button to see exactly what will be sent.
After you add your first column, you will see something like this:

- The first text box is the column name. This will appear in the header line for this column. This is optional - if you don’t specify one then we will take the name from the field in Jazva you are picking to send (picking the field is described in [3]).
- The “Hidden” Checkbox marks this column hidden. This allows you to select a field from an item and have that field available to use in subsequent EL Expressions (EL expressions are described in [4]).
- The (Pick) is a placeholder for the field in Jazva to write to this column. You can navigate a path of fields, for example from the Item to the Product, to have access to almost any piece of data about the item in Jazva. You can further refine this value using an EL Expression. You don’t have to pick a field - you can have a column that is solely an EL Expression.
- The large text field at the bottom is an EL (Expression Language) Expression. This can be used to refine or format the value, or have a column that is a constant or fully computed value based on other columns (which may be hidden). You may refer to this or other columns by the name of the column. The Expression Language is documented at http://docs.oracle.com/javaee/6/tutorial/doc/gjddd.html.
- The trash can icon is used to delete this column.
Here is a more complete example:

- The first column is the Item’s VID, but calls it SKU in the output file.
- The second item is the Item’s Title, and it called Title in the output file.
- The third column is the Inventory Count, and is called Quantity. We also have an EL Expression to prevent us from ever sending more than 100 as the Quantity, even if we have more than that.
- The final column uses a longer field path - Product > Brand Category > Name - and writes that name as “Manufacturer”.
Order Feeds
There are two kinds of feeds you can set up in an Order Feed: Order Import and Order Fulfillment.
- Order Import feeds are feeds that Jazva reads to import orders into the system.
- Order Fulfillment feeds are feeds that Jazva writes for shipped orders, including things like tracking numbers. These feeds are incremental - every time a feed is run it will include information for orders that have been shipped since that last time.
You can create an Order Feed with both Import and Fulfillment parts, or just one of the two. If you create an Import Feed with an accompanying Fulfillment Feed, then the Fulfillment feed will contain information only for shipments that were made for orders received through the associated Import Feed. If you create a Fulfillment Feed that is not attached to any Order Feed it will contain information for all shipments that were made by this client, regardless of how the order was added to the system. Import and Fulfillment feeds are scheduled and run separately.
When you first create an Order feed, neither Import nor Fulfillment feeds are enabled:

To turn one of them on, check the box on the upper right of the box, and the options for that feed will appear. To turn that part back off, uncheck the box and it will go away.
Order Import Setup

- File Format can be CSV, TSV, XLS, or XML. This is the type of file we are parsing.
- Order Import Channel is the primary configuration setting for Order Import feeds. This specifies a Generic Order Import Wizard channel (which is configured in the Channel Setup) to pass orders to. When a new file is picked up, it is parsed into a table (or XML for XML orders) and sent to this channel for mapping into Jazva.
If you have a specific client-specific column setup for this client and don’t want to create a new Generic Order Import Wizard channel, you can also use the Order Import Mappings setting to configure the column setup. If you don’t specify it the mappings configured in the channel will be used.
You would indicate the column mappings by the order they appear in the file. You can ignore a column by setting it to (ignore). Note that the Generic Order Import Wizard has helpful features that make it easier to set up the mappings, so you generally will want to set the mappings up there and leave this unset.
- Transfer Profile is the remote server address described in the General Feed Configuration section.
- Directory is the directory on the remote server to look for order files in.
- Move to Directory specifies a directory on the remote server to move the files to after they are processed. This setting is optional - if not set, then we will leave the files in place, or delete them if Delete Remote File is enabled.
- Delete Remote File indicates that we should delete the file after it is processed.
- Filename Pattern is the pattern of filenames within the Directory to parse as orders. Wildcards such as an asterisk (*) or question mark (?) can be used to represent a number of characters or an empty string. These are used to search for filenames without having to enter the full name.
- Schedule is the schedule, described in the General Feed Configuration section. We will check for files when scheduled and pass them to the Generic Order Import Wizard channel for processing.
New Generic Order Import Wizard Features
Configuring the Generic Order Import Wizard Channel is outside the scope of this document, but new features have been added that are not documented elsewhere and so are described here.
- File type can be TABLE or XML. TABLE is for tabular data - Excel, CSV, or TSV. XML is for XML data.
- Import with status indicates whether the orders should be imported as new unpaid orders, new paid orders that will be shipped in Jazva, or orders that have already been paid and shipped.
- Skip number of lines before header allows you to ignore lines before the CSV header, in case there is extra data in the file before the header line (with the column names).
Configuring a Generic Order Import Wizard for XML Order Import works in much the same manner as the existing Excel order import. After you specify the File type as XML you can upload an XML file or copy XML into the Direct Input field, and then upload & verify to set up the mappings. The difference with XML is that instead of column header names, you will match Jazva fields with XPath locations in the document.
Order Fulfillment Feeds
Fulfillment Feeds are configured in essentially the same manner as Inventory Feeds, except with different fields available to write to the columns.
The base entity is a Parcel Item as opposed to an Item in an Inventory Feed. In this example we navigate to the Order Number, Carrier Name, Tracking Number, and Ship Date.
As mentioned, the fulfillment feed will contain information for orders shipped since the last feed was generated. You may wish to use a date format in the filename to give each feed a different name to prevent files from being overwritten. For example,

That will result in a file name like ship_confirm_20160720_123506.csv. You can do the same with inventory and report feeds as well. Note that if you run “Test Feed”, the file will be downloaded with a filename using the expression specified here, so you can test that as well.

Comments
0 comments
Article is closed for comments.