Learn how to import your products in bulk using a Product Import Wizard.
Contents:
Overview
The Product Import Wizard allows you to upload products from a spreadsheet. You can map each column in the spreadsheet to a Jazva product field and save that mapping for future use.
In Jazva, you can keep as many product import wizards as you’d like. This is useful when maintaining product files that may have different columns and product field mappings.
Here are some fields that can be mapped using the product import wizard:
- SKU, Title, Cost, and Vendor
- Product images, listed by external URL
- Category paths (Multiple categories can be added per product)
- Variations, attributes and multiple item images per variation
- Bullet points, ASINs, Listing IDs, etc
- eBay Motors fitment data for auto parts compatibility
- Product descriptions, keywords, and more.

For updating keywords specifically, you must separate them by commas within the same product row under the Keywords column. Please note that this will override whatever is in that keyword section of the product. So if there are keywords in the existing product you don't want to lose, you'd have to manually type them into their respective row, and then add the rest of the keywords with commas to separate them.
Importing your products in bulk allows you to build your category tree and vendor database simultaneously. Jazva also automatically saves all the new vendors and categories from your import file.
Importing or Updating via Product Import Wizard
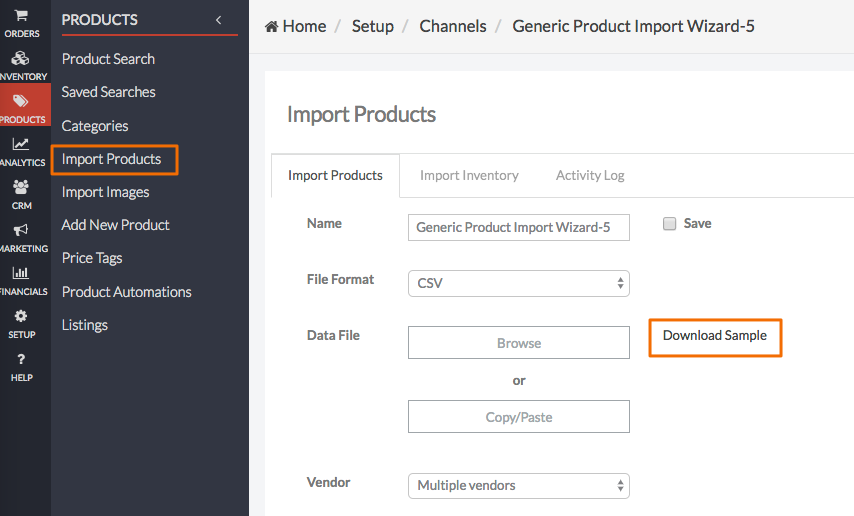
- From the main menu, go to Product and select Import Products.
- If you created a product import wizard in the past, you can select an existing wizard from the list; otherwise, click + to create a new import wizard.
- From the Import Products tab, click Download Sample to obtain a sample import template file.

- Open the file and fill in the spreadsheet with your product, category and vendor data.
- The highlighted headers are required, while the other columns are optional. Please fill out as much information as you can.
- Some columns, such as keywords or fitment data, need to be added manually.
- Once your spreadsheet is ready for import, go back to Jazva. From the Data File section, click Browse to upload your spreadsheet. Adjust the File Format as needed. Alternatively, you can click Copy/Paste to paste values from your spreadsheet into the Products Data box.
- You may select a Vendor from the dropdown list or leave as is (Multiple Vendors) if importing products from multiple vendors.
- Configure the following settings as needed on the right side of the import tab:

- Save – deactivating this setting informs the system of new column headers and resets its import headers based on the file. If you have previously uploaded the same file and activated this setting, there is no need to reset the mapping.
- Update Existing Only – this setting will limit the import to update only the existing products
- Update Titles and Description on Existing – this setting will limit the import to update only the titles and descriptions of existing products.
- Remove Alt Vendors on existing - this setting will remove the current vendors of products being updated.
- Match Items by UPC
-
Add Inventory Count to Existing
-
Discontinuing Absent Items – this setting will deactivate products in the system that are not in your spreadsheet, a useful feature to clean up your product database. - Remove Current Categories – this setting will remove the current categories of products being updated.
- Remove Current Bullets – this setting will remove the current bullets of products being updated.
- Remove Current Tier Price Tags – this setting will remove the current Tier Price Tags of products being updated.
- Category Path Delimiter – enter the character value that you are using to separate categories in your spreadsheet. (e.g. “/” or “>”, used in the spreadsheet as “ParentCategory/SubCategory/SubCategory2”)
- Multiply cost by - Enter a currency conversion rate.
- Click Upload & Verify to begin the upload.
- Once complete, your data will be displayed horizontally with your original spreadsheet headers listed in the left column. Your spreadsheet’s columns will be displayed as rows on this table.
- Review the column header names in the first column. You may be prompted to adjust their mapping by selecting the correct values from the second column drop-down list. To disregard a row, select Ignore from the drop-down list.
- Once all the headers match the mapped values, click Import & Finish button to execute the final upload.
The products will now be in the system and automatically added to the Basket for easy reference. You may adjust these products or remove them from the basket as needed.
Comments
0 comments
Article is closed for comments.