Learn how to assign channel-specific email addresses, allowing you to specify which account the emails will be sent out from.
Contents
Setting Up Outgoing Email Servers
You can set a channel to use an external email server, allowing it to send out messages from a preferred email account.
- From the main menu, navigate to Setup and select Channels.
- Open an existing channel.
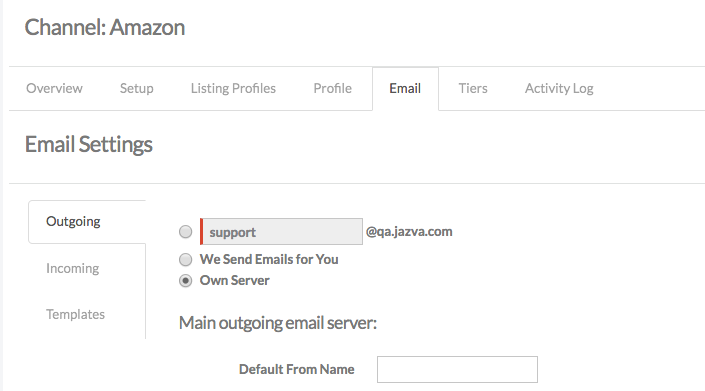
- Toggle to the Email tab. It should default to the Outgoing section.

- Select the Own Server option.
- In the Main Outgoing Email Server section, enter the required server settings and account credentials:
- Default From Name – the name that will appear as the sender.
- Default From Email – the email address that will appear as the sending email address.
- Channel Specific Server – sets the channel to use an external email server.
- Host – the mail server that will send the messages.
- Port – the port to connect to the mail server.
- Username – the login credentials for the email account (e.g. youraccount@mail.com)
- Password – the password to access the email account.
- Auth – enables the authorization credentials to access the server.
- Start TLS – enables Transport Layer Security (TLS) to encrypt the emails sent to the mail server.
- Click Save.
To confirm if the mail server has been set up successfully, perform tests to see if messages are sending out. Depending on your email service provider and personal settings, additional notifications and confirmation prompts may need to be addressed to complete the connection.
You can also set up a designated mail server exclusively for newsletters in the Newsletter Outgoing Mail Server section.
Customizing Email Templates
Jazva offers a range of email templates which can be customized to your liking. You can send out automated messages for order confirmations and shipping notifications, and these templates can be customized for specific channels.
- Open an existing channel.
- Toggle to the Email tab and switch to the Templates section.
- Choose a template from the left sidebar, or select Create template to add a new template.

- Configure the following options and complete each section as needed:
- Disable Template – this will set the template inactive and will prevent emails from being sending out.
- HTML Template – this sets the template to read HTML code from the message body.
- Subject. - the subject line of the email.
- Conversation Type and Target Status - Optional. Used for CRM purposes.
- Body - enter your content or HTML code you wish to include in the email.
- Click Update to save.
Click Preview to review the email template. You can also perform tests from the Send Template Test Email section.
Using Email Template Shortcodes
Here is a list of Jazva-specific codes for your HTML templates. These codes will pull specific data from your Jazva system and display them appropriately on your template.
Orders
- Store Name (Channel Name): $order.store.name
- Store Phone: $order.store.pubphone
- Store Email: $order.store.email
- Shipping Full Name: $order.shipTo.contactFullName
- Shipping Company Name: $order.shipTo.companyName
- Shipping Street 1: $order.shipTo.street1
- Shipping Street 2: $order.shipTo.street2
- Shipping City: $order.shipTo.city
- Shipping Zip Code: $order.shipTo.zip
- Shipping Country: $order.shipTo.country
- Shipping Type: $shippingtype
- Shipping Charge: $order.shippingPrice
- Order line items*: $order.lineitems
- Line Item Description*: $litem.description
- Line Item UPC*: $litem.item.upc
- Line Item Price*: $litem.unitPrice
- Line Item Quantity*: $litem.quantity
- Line Item Total Price (Quantity x Price)*: $litem.totalPrice
- Line Item VID*: $lineitem.vitemid
- Line Item Alternative SKU*: $iitem.lineitem.item.altSKU
- Line Item MPN*: $iitem.lineitem.item.mpn
- Order Date: $order.date
- Order Number $order.orderNum
- Order Po Number $order.poNumber
- Order Subtotal: $order.subtotalWithoutDiscounts
- Order Discount: $order.discountItemTotal
- Order Tax: $order.tax
- Other Charges: $order.other
- Order Total: $order.totalPurchaseValue
- Parcel: $parcel
- Parcel Mailclass Name: $parcel.mailclass.fullname
- Parcel Tracking Number: $parcel.tracking
- Parcel Tracking Number Link: $parcel.trackingLink
- Dropship Note: $note (If there is $note, include $note)
Channel/Store Information
- Channel Name: $channel.name
- Sender Street 1: $channel.channelContactInfo.senderStreet1
- Sender Street 2: $channel.channelContactInfo.senderStreet2
- Sender City: $channel.channelContactInfo.senderCity
- Sender State: $channel.channelContactInfo.senderState
- Sender Zip Code: $channel.channelContactInfo.senderZip
Invoices
- Invoice Date: $invoice.invoiceDate
- Invoice Number: $invoice.invoiceNumber
- Invoice Items*: $invoice.items
- Invoice Item Quantity: $iitem.quantity
- Invoice Item VID: $iitem.lineitem.vitemid
- Invoice Item Description: $iitem.lineitem.description
- Invoice Item Image: $iitem.lineitem.item.getImage(0)
- Invoice Shipping First Name: $invoice.shipTo.contactFirstName
- Invoice Shipping Last Name: $invoice.shipTo.contactLastName
- Invoice Shipping Company Name: $invoice.shipTo.companyName
- Invoice Shipping Street 1: $invoice.shipTo.street1
- Invoice Shipping Street 2: $invoice.shipTo.street2
- Invoice Shipping City: $invoice.shipTo.city
- Invoice Shipping State: $invoice.shipTo.state
- Invoice Shipping Zip Code: $invoice.shipTo.zip
- Invoice Shipping Country: $invoice.shipTo.country
- Invoice Store Name: $invoice.order.store.name
- Invoice Store Email: $invoice.order.store.email
- Invoice Store Phone Number: $invoice.order.store.pubphone
- Invoice Parcels: $invoice.parcels
Returns & Refunds
- Return Manual Authorization (RMA): ${ret.rma}
- Return Authorization Number (RAN): ${ret.ran}
- Return Order Number: ${ret.myorder.orderNum}
- Return Order Store Name: $ret.myorder.store.name
- Return Order Number: $ret.myorder.orderNum
- Customer Email: $ret.myEmail
- Store Domain Host Name: $ret.myorder.store.host
- Return Item Quantity: $ritem.quantity
- Return Line Item Description*: $ritem.lineitem.description
- Return Order Store Email: $ret.myorder.store.email
*For any shortcode that applies to an individual line item, it will need to be placed in a #foreach loop in order for the code to display the appropriate value for each item in the order/invoice/return.
For example:
#foreach( $litem in $order.lineitems)
<!-- line item code goes here -->
#end
Or
#foreach( $iitem in $invoice.iitems)
<!-- invoice item code goes here -->
#end

Comments
0 comments
Article is closed for comments.