Learn how to create vendor invoices, allocate them to a shipment, and reconcile any discrepancies.
Contents:
- Overview
- Creating Vendor Invoices
- Allocating an Invoice to One Shipment
- Reconciling Invoices and Shipments
- FAQs
Overview
Jazva lets you record financial information related to inventory, and involves receiving stock, recording an invoice and allocating that invoice to a shipment. Payables can be recorded in Jazva to ensure you have an accurate record of your financials.
The purchase order (PO) and vendor invoice documents are separate in Jazva. The PO does not directly impact your financials in the system. The actual received shipment, along with the filed vendor invoice, are what really impact your inventory and financial information in the system.
Jazva tracks inventory cost using the FIFO principles. It allows you to record actual cost per transaction and as inventory sells it allocates COGS based on oldest cost of received goods.
Once you receive a shipment, and create a vendor shipment, you will need to record the invoice(s) for that shipment. You will need to ensure they are connected properly. If an amount on the invoice matches a shipping amount, Jazva will reconcile and close it automatically.
If the amounts do not match perfectly, you will need to reconcile the invoice with the shipment by assigning each line item to the designated invoice and updating quantity invoiced if it is different from quantity received. Only then will the Cost of Goods Sold (COGS) be stored and ready for recording.
To demonstrate all the components, let's look at a fairly complex example of a PO:
PO #123 for just one SKU xyz, quantity 100, expected cost: $1/each (total $100)
which is received in 2 shipments:
Shipment 1: SKU xyz qty: 48 with 2 invoices:
Invoice 1: qty 30, unit price $1.00 Freight: $10.00 Total: $40.00
Invoice 2: qty 20, unit price $2.00 Freight: $10.00 Total: $50.00
Shipment 2: SKU xyz qty: 40
Invoice 3: qty 40, unit price $1.00 Freight: $15.00 Total: $55.00
The above shows that: we ordered 100, received 88 and were billed for 90, with various cost for various quantities.
To reconcile all that and have the system produce a report, stating that we were short-shipped 2 items you will need to reconcile the vendor invoices with their corresponding shipments.
Note that each shipment can have multiple vendor invoices, which can belong to different original POs.
Creating Vendor Invoices
1. From the main menu, go to Inventory and select Vendors.
2. Select the vendor you will be creating an invoice for.
3. Click Quick Links and select New Invoice.
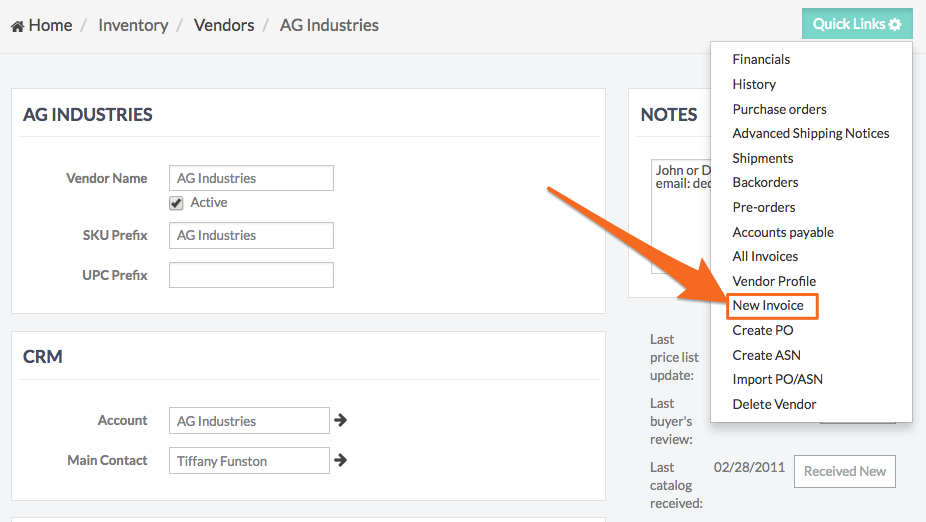
4. Enter the relevant invoice information, such as the invoice date, invoice number, due date, PO number, shipment id, freight, credit and other financial information.
- If you don’t have the shipment id at this time, you can come back and add it later to this invoice
5. A soft copy of the original invoice can also be uploaded from the File upload section.
6. Click Create New Invoice to complete.
Allocating an Invoice to One Shipment
This is the easiest way to allocate an invoice to a shipment, but it is only applicable if the data is clean and simple, such as allocating 1 invoice to 1 shipment.
1. From the main menu, go to Inventory and select Vendors.
2. Select the vendor you will be allocating an invoice to.
3. Click Quick Links and select Financials.
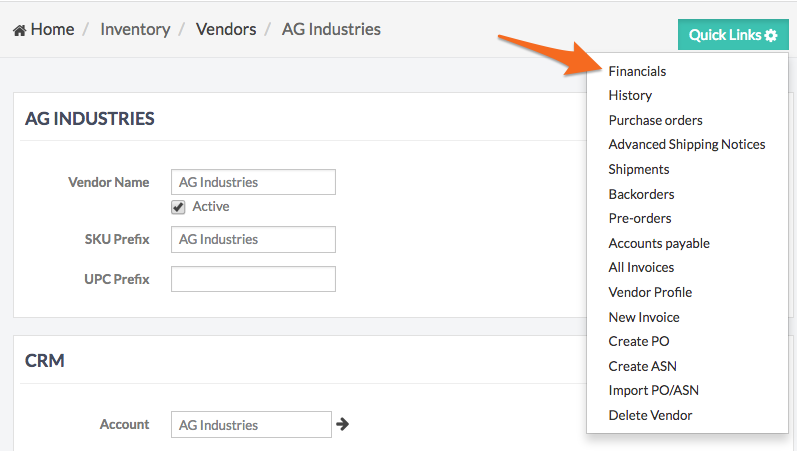
4. Under Open Invoices, mark the invoice you will be allocating.
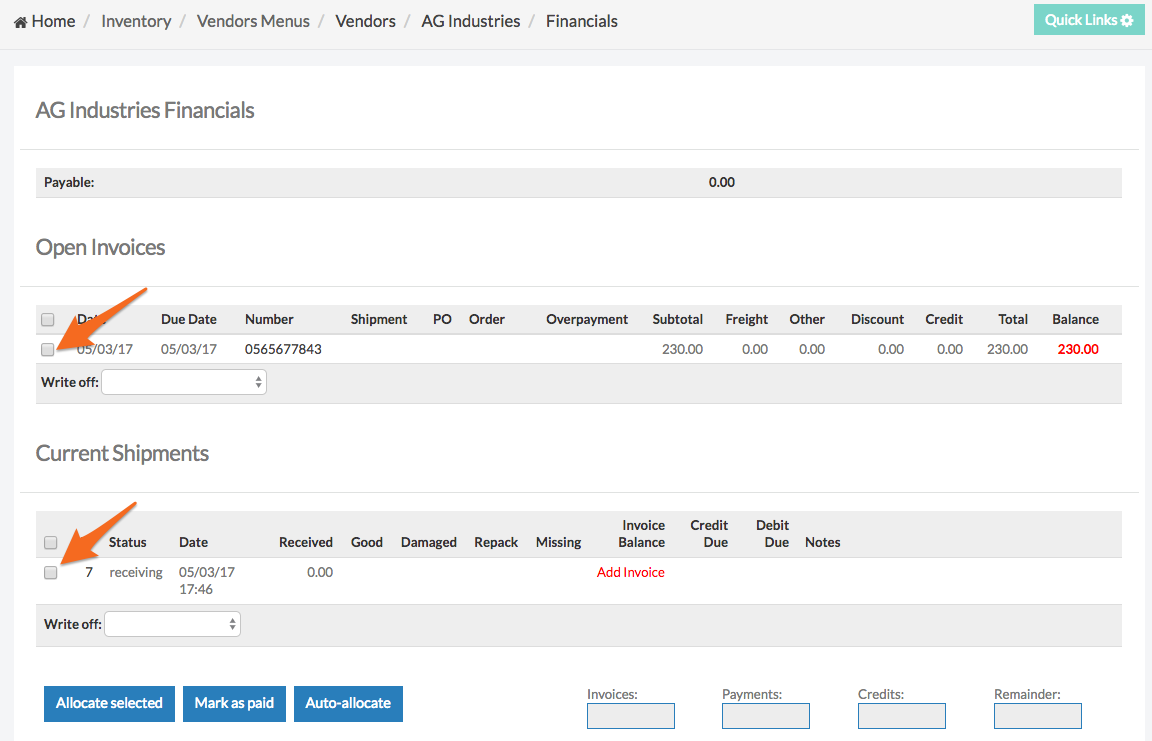
5. Under Current Shipments, mark the shipment you will be allocating the invoice to.
6. Click Allocate Selected to complete.
Reconciling Invoices and Shipments
There will be times when the actual received goods (shipment) and invoice amounts do not match, and you will need to handle these discrepancies in Jazva. When reconciling the invoice with the shipment, you will need to match the shipment total with the invoice subtotal.
The reconciling process may vary depending on the scenario, but generally you would need to:
- If not done already, add the shipment id to one (or more) invoice(s).
- One shipment can be allocated in one or more invoices.
- Open an existing shipment.
- Go to the shipment’s Reconcile tab and select each invoice. Indicate the over-shipped or under-shipped quantities. You can adjust the invoiced quantity (which may or may not match the received quantity), or indicate a price change on the reconciliation screen.
Understanding the Reconciliation Screen
Here’s a quick breakdown of the shipment reconciliation screen for reference.
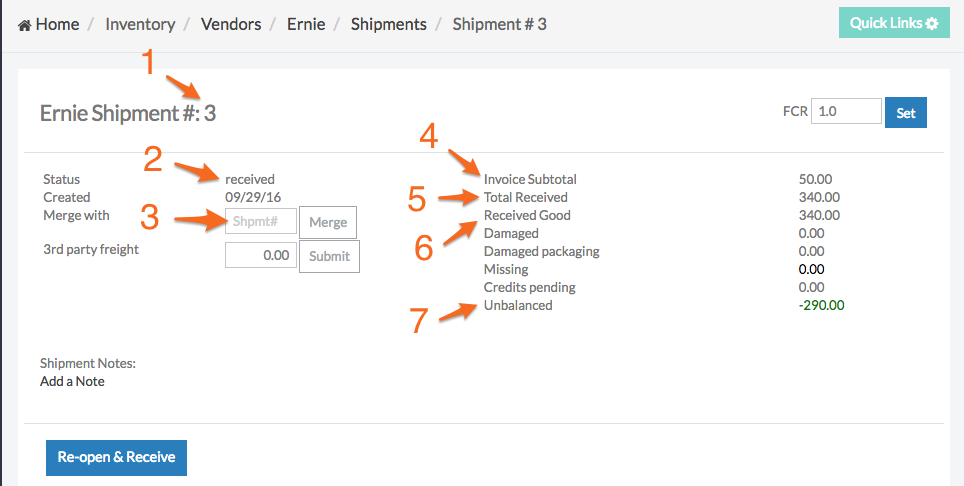
- Shipment ID. You can access the shipment from the Vendor’s quicklinks or Inventory > View Received.
- Current status of the shipment.
- Option to merge this shipment to another shipment in Jazva (in case they were invoiced together).
- Invoice Subtotal - subtotal from the recorded vendor invoices.
- Total Received - Total monetary value in the shipment as actual quantity received.
- Received Good, Damaged, Damaged packaging, Missing - Monetary value of goods in the respective conditions when received.
- Unbalanced - discrepancy between Jazva’s anticipated shipment value and the vendor invoice(s) subtotal.
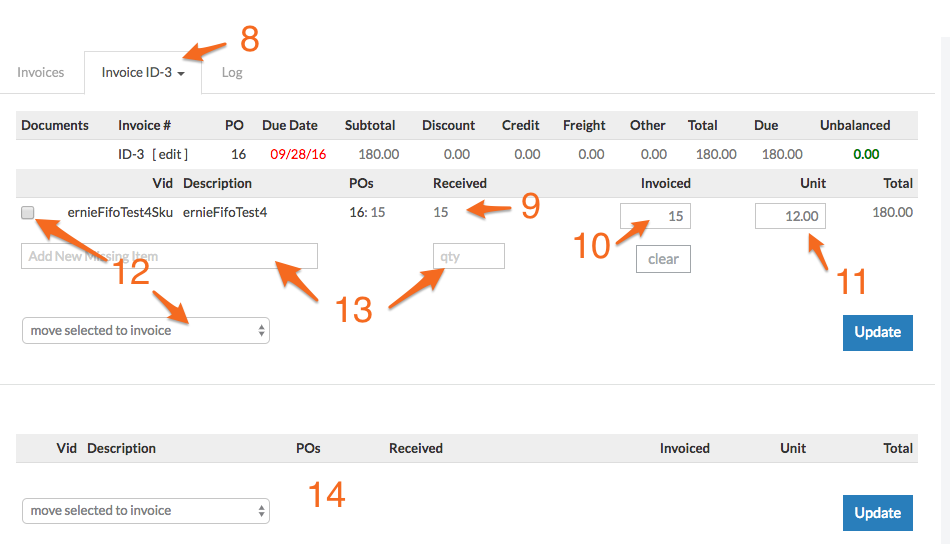
- Reconcile tab, showing the current invoice. You can toggle between invoices from this dropdown.
- Actually received in Jazva
- Invoiced by the vendor can be modified if the invoiced quantity is different from the actually received.
- Cost per unit, pre-populated by Jazva. This can be modified if the vendor invoiced a different cost.
- If the item in the shipment is not invoiced in this invoice (Invoice ID-3), mark the item and move it to another allocated invoice, or move to “unallocated” in this dropdown.
- File a missing item recorded in the invoice but never received.
- Unallocated items from this shipment (currently not moved or added to any invoice) will be listed here.
Example A: 2 POs, 1 Shipment and 2 Invoices

Receiving
- Upon arrival of the goods from your vendor, navigate to Inventory > Shipments and click Receive Now; or simply open the PO and click Receive.
- Select the Vendor you are receiving goods from and enter the first PO number as needed.
- Receive the items for the first PO.
- Once complete, enter the second PO number and continue.
- Upon completion, select Finish Receiving. This will close the shipment you are working on.
- Update both invoices in Jazva and make sure you apply the appropriate Shipment ID from the above steps.
Reconciliation
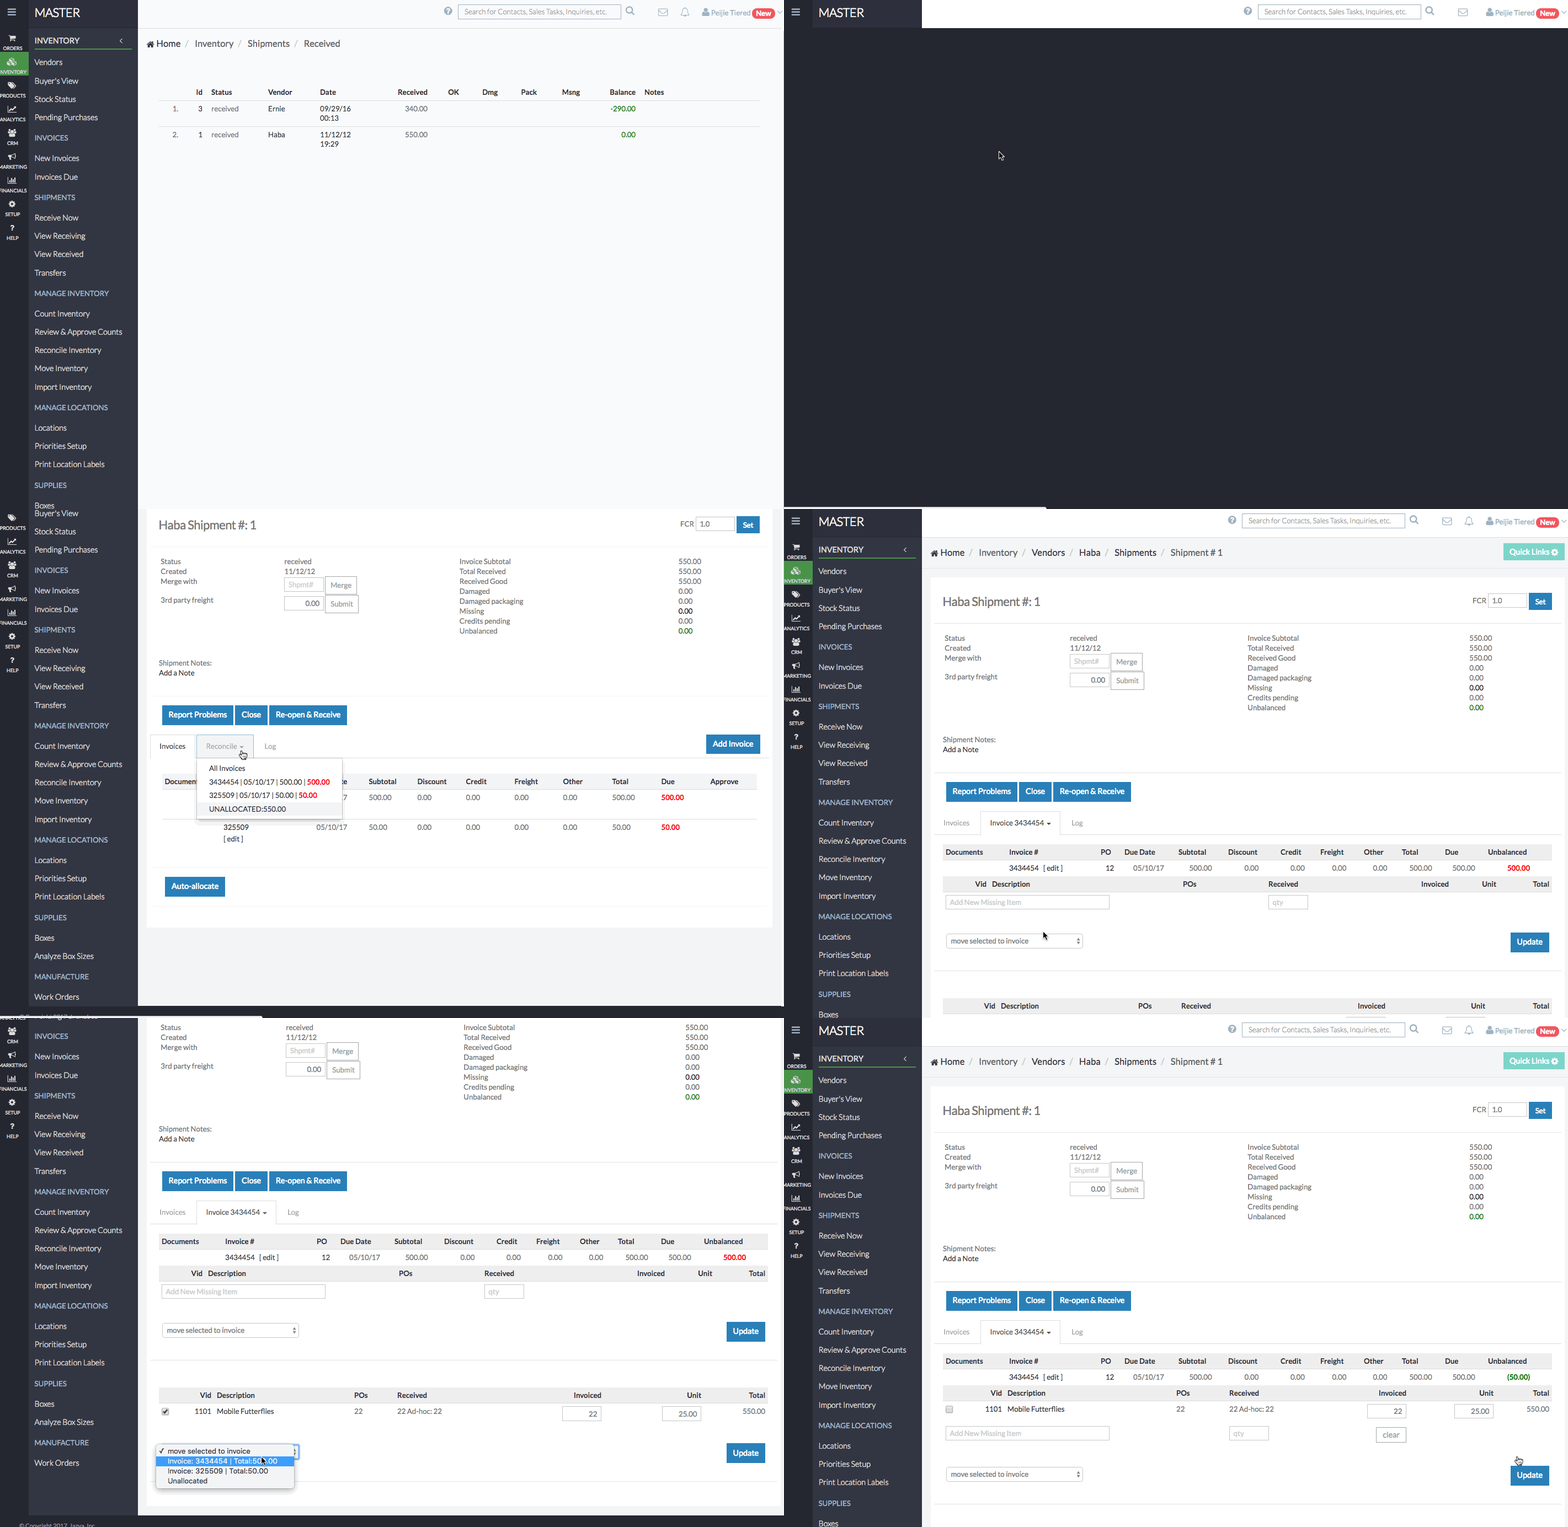
- Open the shipment used to receive the two previous POs.
- Click the Reconcile tab drop-down and select the first invoice that is intended for the shipment (please note, invoices will only appear if they are assigned to the shipment).
- You will now be allocating line items to the designated invoice. In the line items section, mark the checkboxes of the items that are billed in the first invoice.
- Select Move Selected to Invoice and choose the designated invoice from the dropdown. Click Update to save.
- Click the Reconcile tab drop-down again (this may appear as an Invoice tab). Select the second invoice intended for the shipment.
- Repeat steps 3 and 4.
- Click Close.
Example B: 1 PO received in 2 Shipments and charged for 1 Invoice
Receiving
- Upon arrival of the goods from your vendor, navigate to Inventory > Shipments and click Receive Now; or simply open the PO and click Receive.
- Select the Vendor you are receiving goods from and enter the PO number as needed.
- Receive the items for the first shipment and click Finish Receiving to close the first shipment.
- Repeat steps 1 to 3, the result will be the same PO but received in two separate shipments.
Reconciliation
In this scenario, all items belong to once invoice, so you will need to merge the shipments, then assign the merged shipment to the invoice.
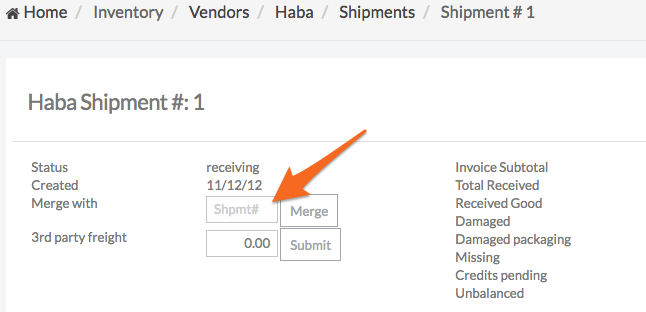
- Open any of the two shipments.
- In the Shpmt# field, enter the other shipment’s id and click Merge.
- From the merged shipment, click the Reconcile tab drop-down and select the invoice that is intended for the shipment (please note, invoices will only appear if they are assigned to the shipment).
- You will now be allocating line items to the designated invoice. In the line items section, mark the checkboxes of all the items that are billed in the first invoice.
- Select Move Selected to Invoice and choose the designated invoice from the dropdown. Click Update to save.
- Click Close.
Example C: 3 POs received in 1 shipment and charged for 2 separate invoices.

Receiving
- Upon arrival of the goods from your vendor, navigate to Inventory > Shipments and click Receive Now.
- Select the Vendor you are receiving goods from and enter the first PO number.
- Receive the items for the first PO and once complete, enter the second PO number and repeat. Proceed with the third PO until all goods are received.
- Upon completion, select Finish Receiving. This will close the shipment you are working on.
Reconciliation

- Open the shipment used to receive the goods.
- Click the Reconcile tab drop-down and select the invoice that is intended for the shipment (please note, invoices will only appear if they are assigned to the shipment).
- You will now be allocating line items to the designated invoice. In the line items section, mark the checkboxes of the items that are billed in the first invoice.
- Select Move Selected to Invoice and choose the designated invoice from the dropdown. Click Update to save.
- Click the Reconcile tab drop-down again (this may appear as an Invoice tab). Select the second invoice intended for the shipment.
- Repeat steps 3 and 4.
- Click Close.
FAQs
Question: I received an invoice against a shipment. Then in order to reconcile the invoice against the shipment, I had to add the shipment number to the invoice. After I added the shipment to the invoice, the "Financials" page shows the shipment as archived, but the invoice is still open.
- Answer: If the subtotal on the invoice you entered into the system is matching a shipping amount, our system will reconcile it automatically. You do not have to reconcile manually shipments that match the invoice(s) subtotal.

Comments
0 comments
Article is closed for comments.