Learn how to process returns and refunds in Jazva.
Contents:
- Overview
- Creating a New RMA
- Processing an RMA
- Printing/Reprinting Return Labels
- Issuing a Manual Refund
Overview
Returns and refunds management is a crucial aspect in any ecommerce order management system. Making sure your customers are properly refunded is important, while properly managing returns will help keep your inventory in sync.
Returns and refunds can only be done for shipped orders. If an order is canceled before being shipped, Jazva will not collect or process the payment.

To process a return request, you must complete a return merchandise authorization (RMA). When you process an RMA, Jazva will automatically issue a refund if it is for a channel that supports returns.
Currently, only 4 external channels support returns: Amazon, Jet, Magento, and Walmart.
For all other channels, you can still create an RMA as a record in Jazva, but you will need to send a refund to the channel instead of a return. To do this, or if you need to issue credit against an order, you will have to process the refund directly via the Refund button from the order’s Totals section.

Creating a New RMA
The first step to process a return request is to complete an RMA.
- Open the order that requires return processing.
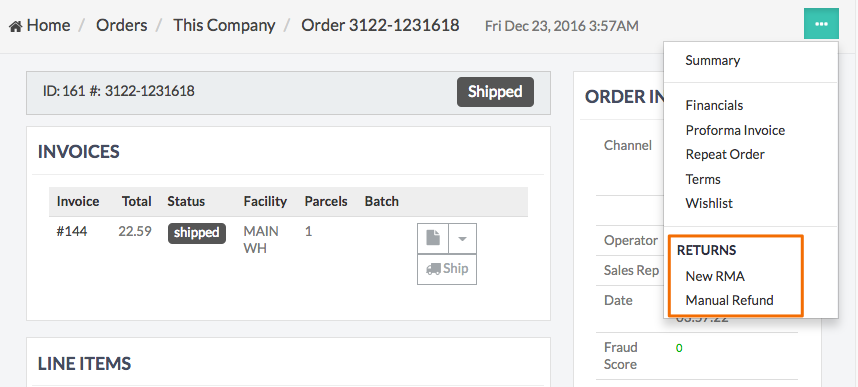
- From the top right corner, click the actions menu > Returns and select New RMA.
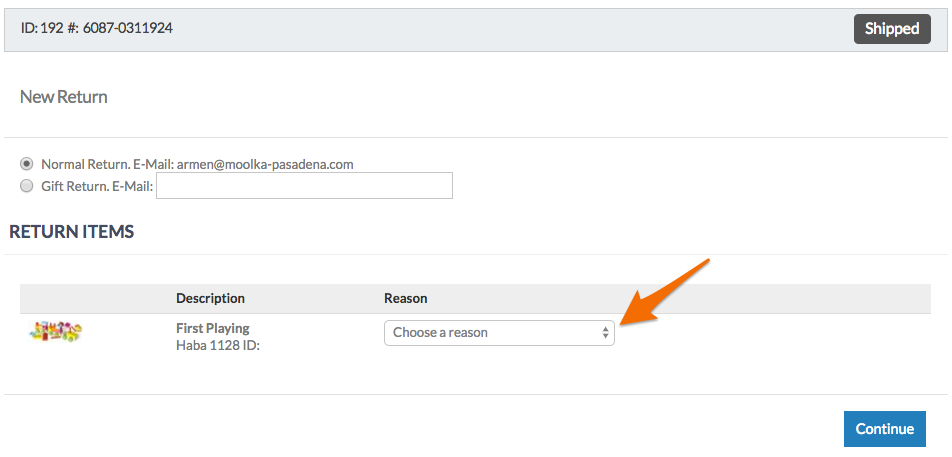
- Select if the return will be a Normal Return or a Gift Return.
For each item that needs to be returned, select a reason from the drop-down menu and follow the corresponding steps:

Item not needed or Not what I expected:
The customer will be responsible for providing the return label. Jazva will not generate a return label. No refund for forward shipping will be issued.
- Enter the Quantity of items being returned.
- Enter any Comments you wish to add to the return (optional).
- Click Continue.
- Edit the return email as needed.
- Click Send.
Damaged item or Wrong Item Received:
The customer has the option to exchange item(s). The return label can be generated from Jazva. Forward shipping charges will be refunded.
- Enter the Quantity of items being returned.
- Select whether to credit the account or exchange the item for the correct one.
- Specify details of the damaged/wrong item in the comment box (optional).
- Click Continue.

Depending on your selection to exchange or credit the account, one of the following options will appear:
“No, simply credit my account”
Return label options will appear. Select from the following and click Continue:
- “No label. Self return.” – customer will provide their own label
- “E-Mail label” – Return label will be emailed to customer.
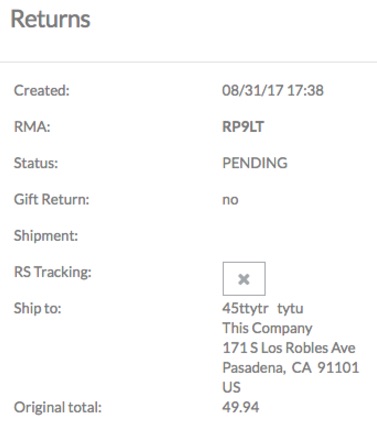
Once completed, you will be brought to the Returns page for the order. This is the area you can go to in the future to see returns history and information for the order, as well as, processing the RMA when the return item has been received. Take note of the RMA ID as needed.

“Yes, send me the correct item”
- You will need to fill out the the return shipping address.
- Complete the form and click Submit.
- A new order will be generated automatically with a Pending status.
 A link to the order ID will be provided in the Returns screen under “Exchange.”
- When the order is processed, a Return label will be printed out, along with the normal shipping label, which you can include in the shipment for the customer.
Processing an RMA
When the return item has been received at your warehouse and you are ready to process the return, obtain the RMA ID from the package and follow these steps:
- Open the existing RMA.
- From Jazva’s global search bar, enter the return prefix code: “r”, followed by a space, and then the RMA ID. For example, use “ r RP9LT”.

- Alternatively, you can access the return by going to the order and opening the actions menu > Returns.
- Scroll down to Return Options section, select the item being returned.

- Select the Condition of the item.
- Enter the Actual Quantity received.
- Select whether or not to email the customer that the return has been processed.
- Select Store Credit Only (No CC Refund) if applicable.
- Enter a Restocking fee if applicable.
- Click Submit.
Printing and Reprinting Return Labels
Should you need to print or reprint a return label for returns that were credited back to the customer’s account, follow these steps:
- Open an existing RMA.
- The return label and links for any tracking numbers will be listed under RS Tracking.
- Click the print icon next to the tracking number, and a PDF file of the return label will be downloaded.
- Open and print the PDF file or attach it in an email as needed.
Issuing a Manual Refund
A manual refund will create a credit note against an order and make the order unbalanced. This will then allow you to initiate the Refund from the order’s Totals section.
- Open an existing order.
- Select the actions menu and select Manual Refund.

- Complete the details, including the amount, refund option, and option to email the customer.
- Click Submit.
- You will be redirected to the order page. Go to the Totals section and verify the Credit Due to the customer. Click Refund to finalize the transaction.

Comments
0 comments
Article is closed for comments.